By Bunty Pundir
The Adobe Photoshop CC 2021 was released in October 2020, and it is loaded with a lot of new features. The new features are huge and backed by Adobe Sensei technology which uses algorithmic calculations and provides you the best possible non-destructive results.
Some of the features that stand out to me are Sky Replacement, Neural Filters, and Improved Select & Mask which uses A.I. to do the job.
In this post, we’ll have a look at the top 12 new features of Photoshop 2021. You’ll not only learn how you can use these features, but we’ll also look at what this means for you as a compositing artist, and much more. Without any further ado let’s get into it!
We’ll cover these features. Feel free to jump ahead to any of them:
- Sky Replacement
- Skin Smoothing – Neural Filter
- Smart Portrait – Neural Filter
- Colorize – Neural Filter
- Reset Smart Objects
- Pattern Preview
- Live Shape Enhancements
- Improved Select & Mask
- Plugins Menu
- Brush Search
- History Version of Cloud Documents
- Quick Actions
New Feature #1 – Sky Replacement
There is no doubt that Adobe is taking on Luminar 4 by introducing this new feature of Sky Replacement and it can replace the sky in just one click. What I like about this feature is whatever the settings we made to replace the sky it preserves all those settings as layers and allows you to refine them further. Basically, it is non-destructive, exactly what we want!
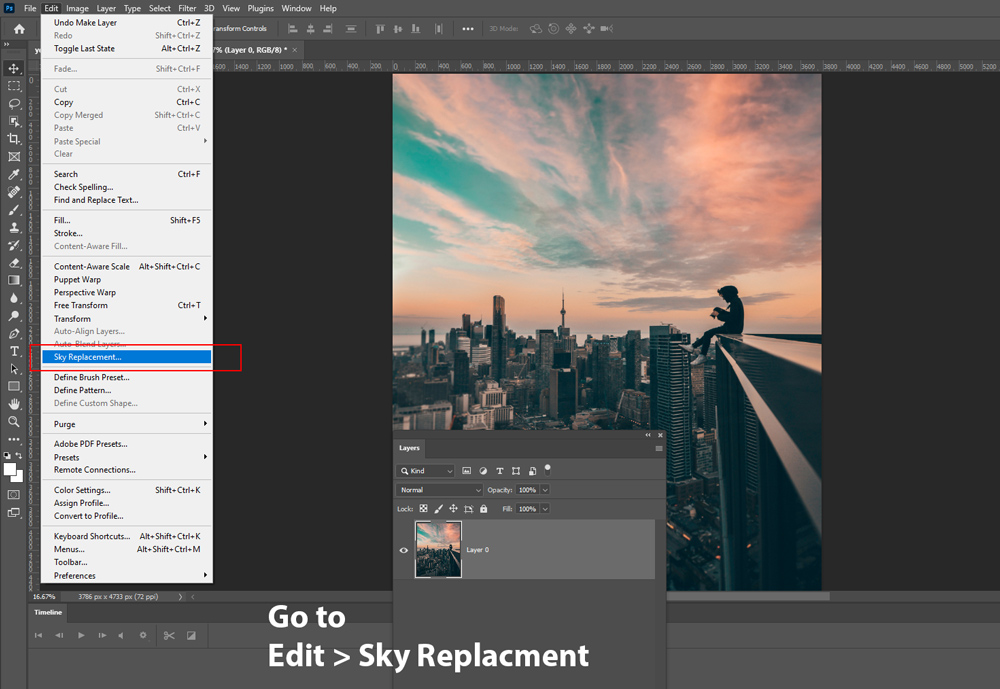
To access the Sky Replacement Feature, you can go to Edit > Sky Replacement.
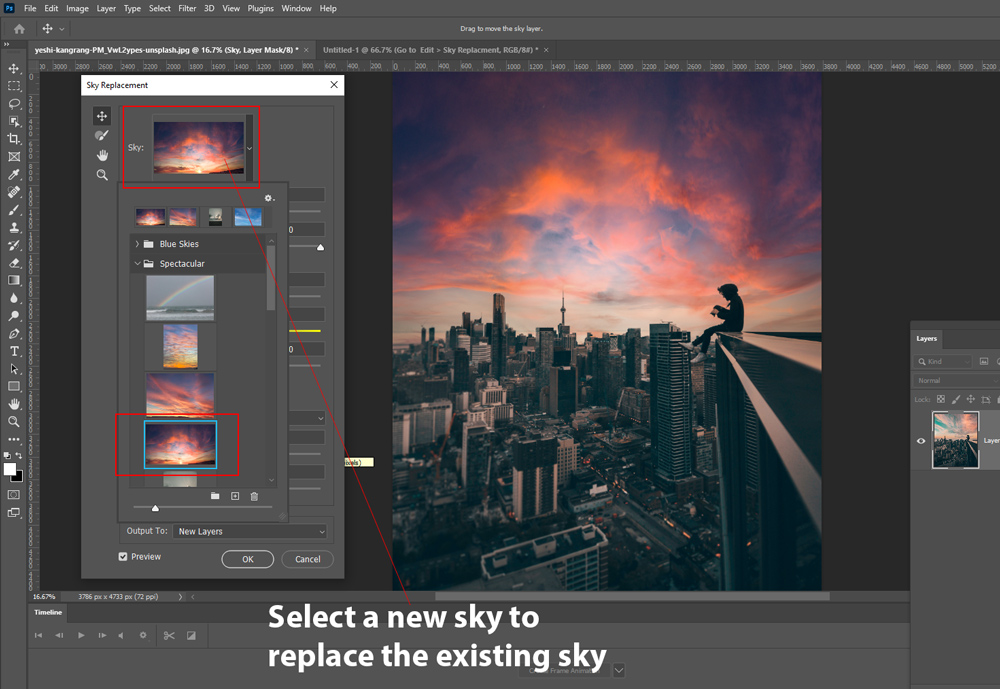
Once you are in the Sky Replacement dialog box, just select a new sky from the Sky List and boom you are done!
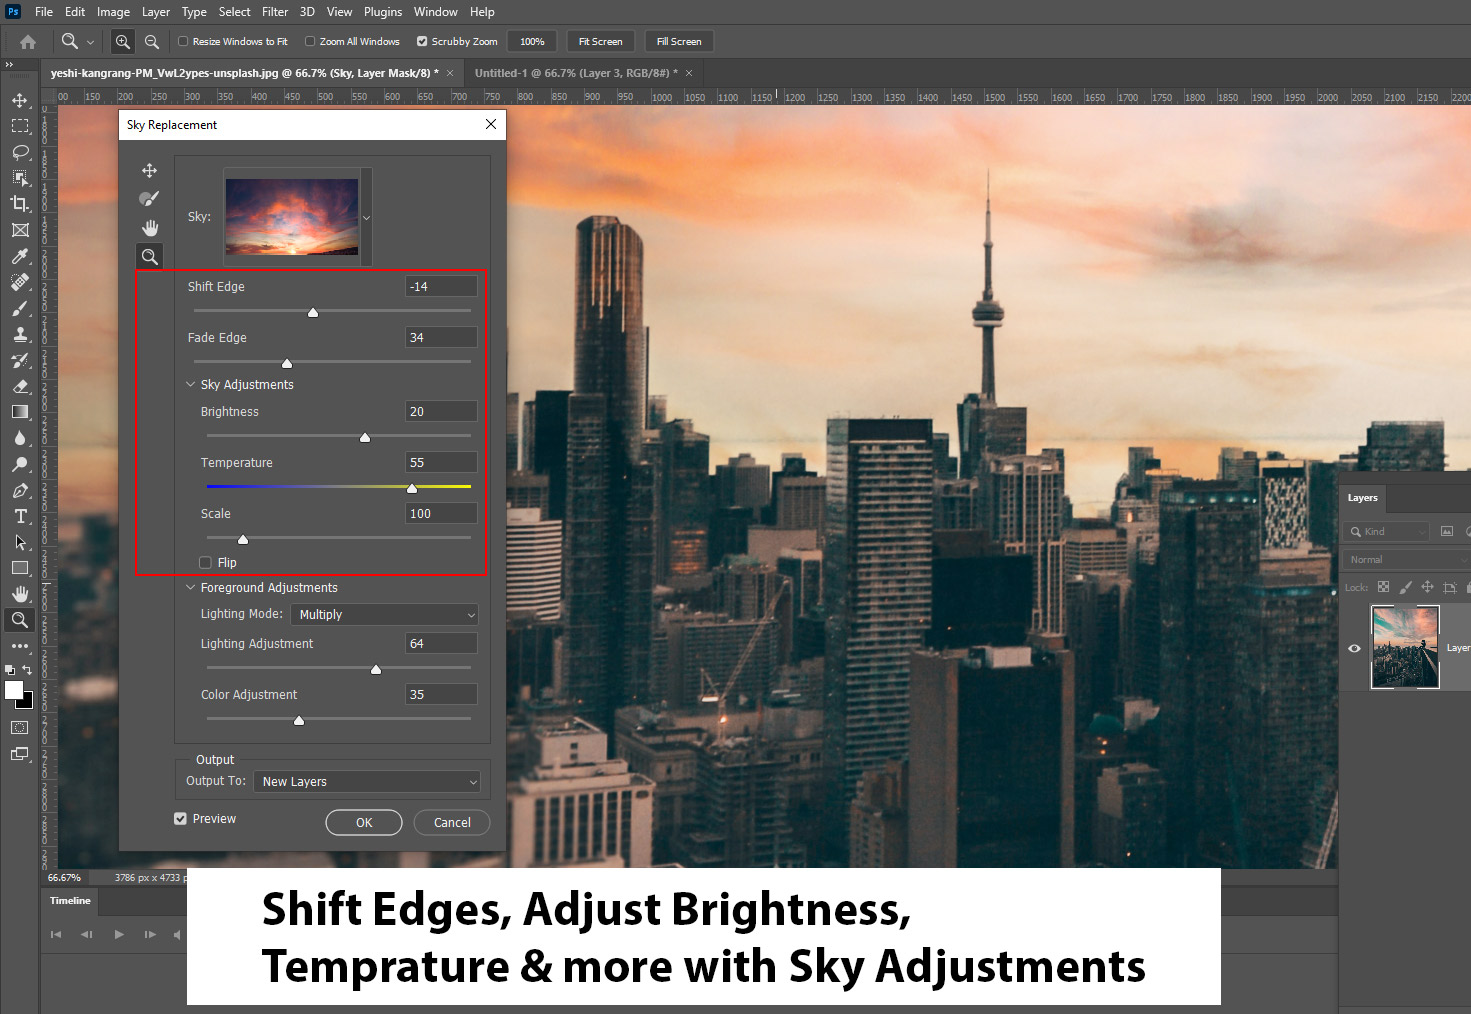
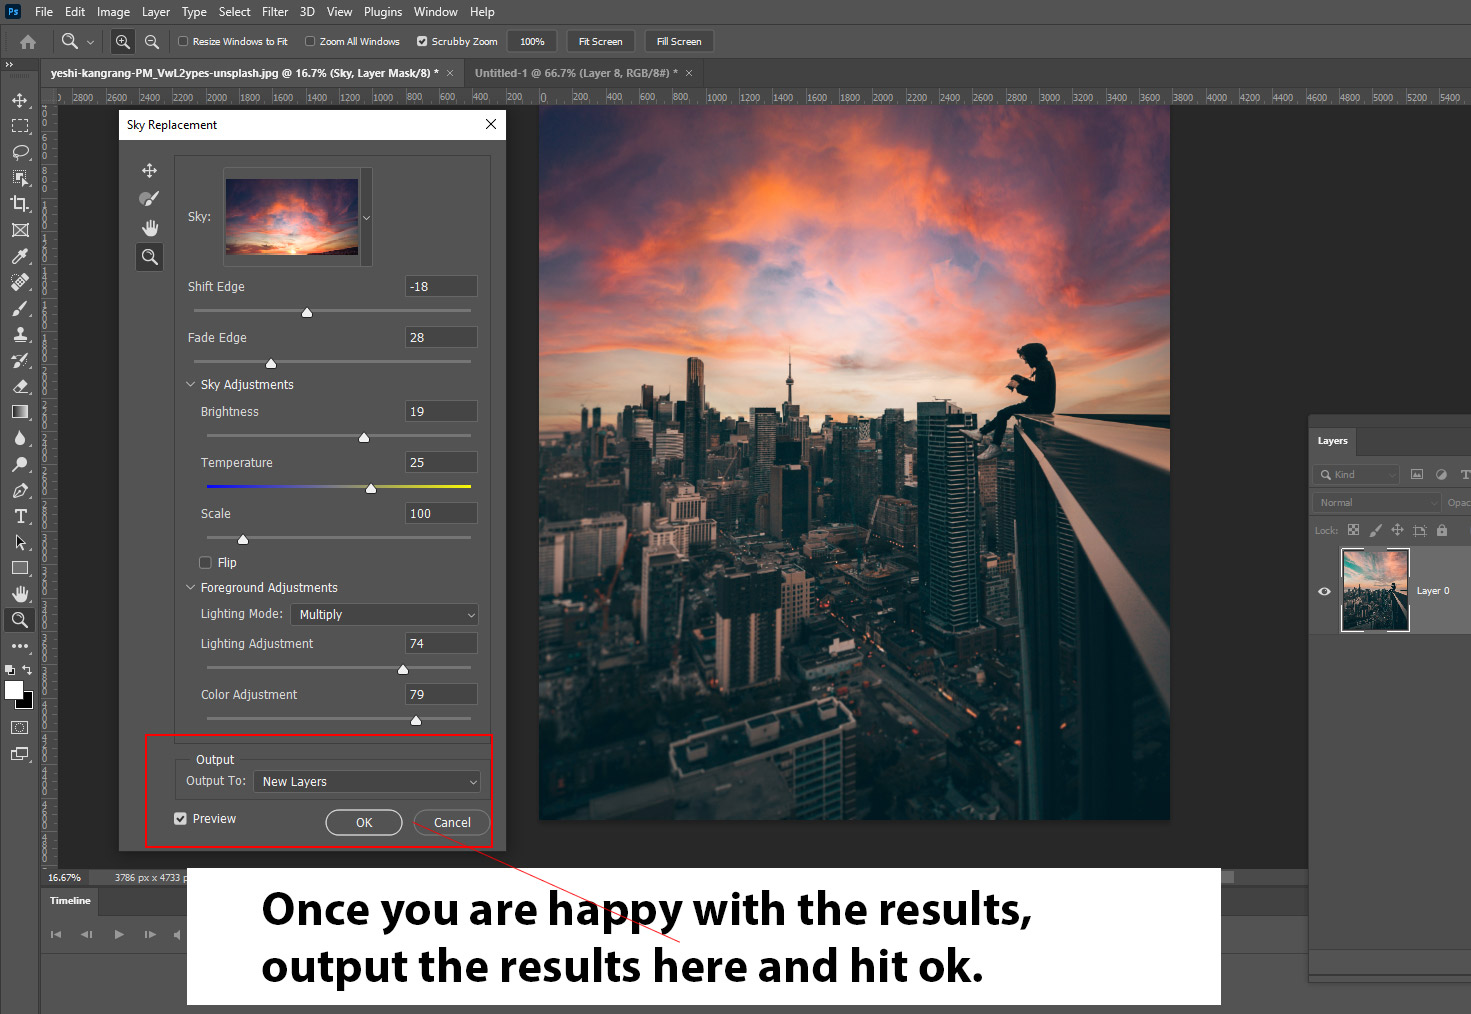
If you are not happy with the results, especially with the edges of the sky you can shift them either one way or another way using the Shift Edge Slider. You can even fade in or out edges using Fade Edge Slider. If you see fuzzy edges you can use these sliders to fix those edges. In the Sky Adjustments, you can adjust the Brightness & Temperature as well.
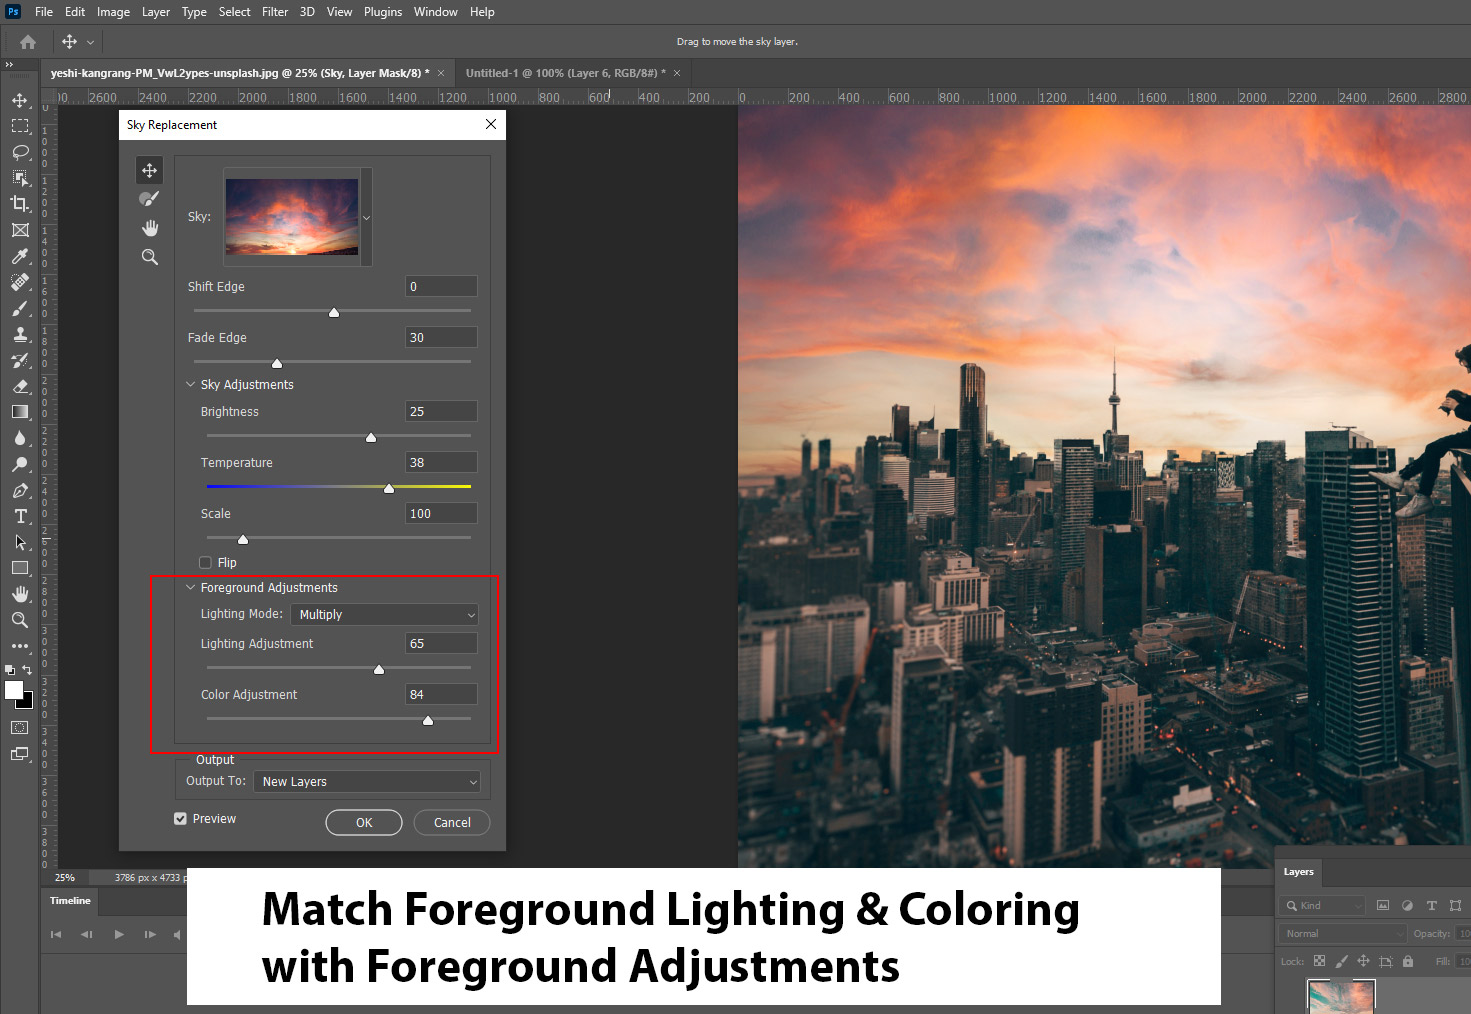
We can also use Foreground Adjustments Sliders to match the coloring and lighting of the foreground. Keep in mind that you have two Lighting Mode: Multiply & Screen which you might want to choose wisely. If you are working on a sunset sky you might want to go for Multiply Blend mode as it produces a dark moody effect. On the other hand, you can use choose Screen Lighting Mode for a bright sunny effect.
Color Adjustments will match the color of the sky with the foreground, basically, it gonna take the color from the new sky which happens to be most in the new sky, and then simply adds it to the foreground.
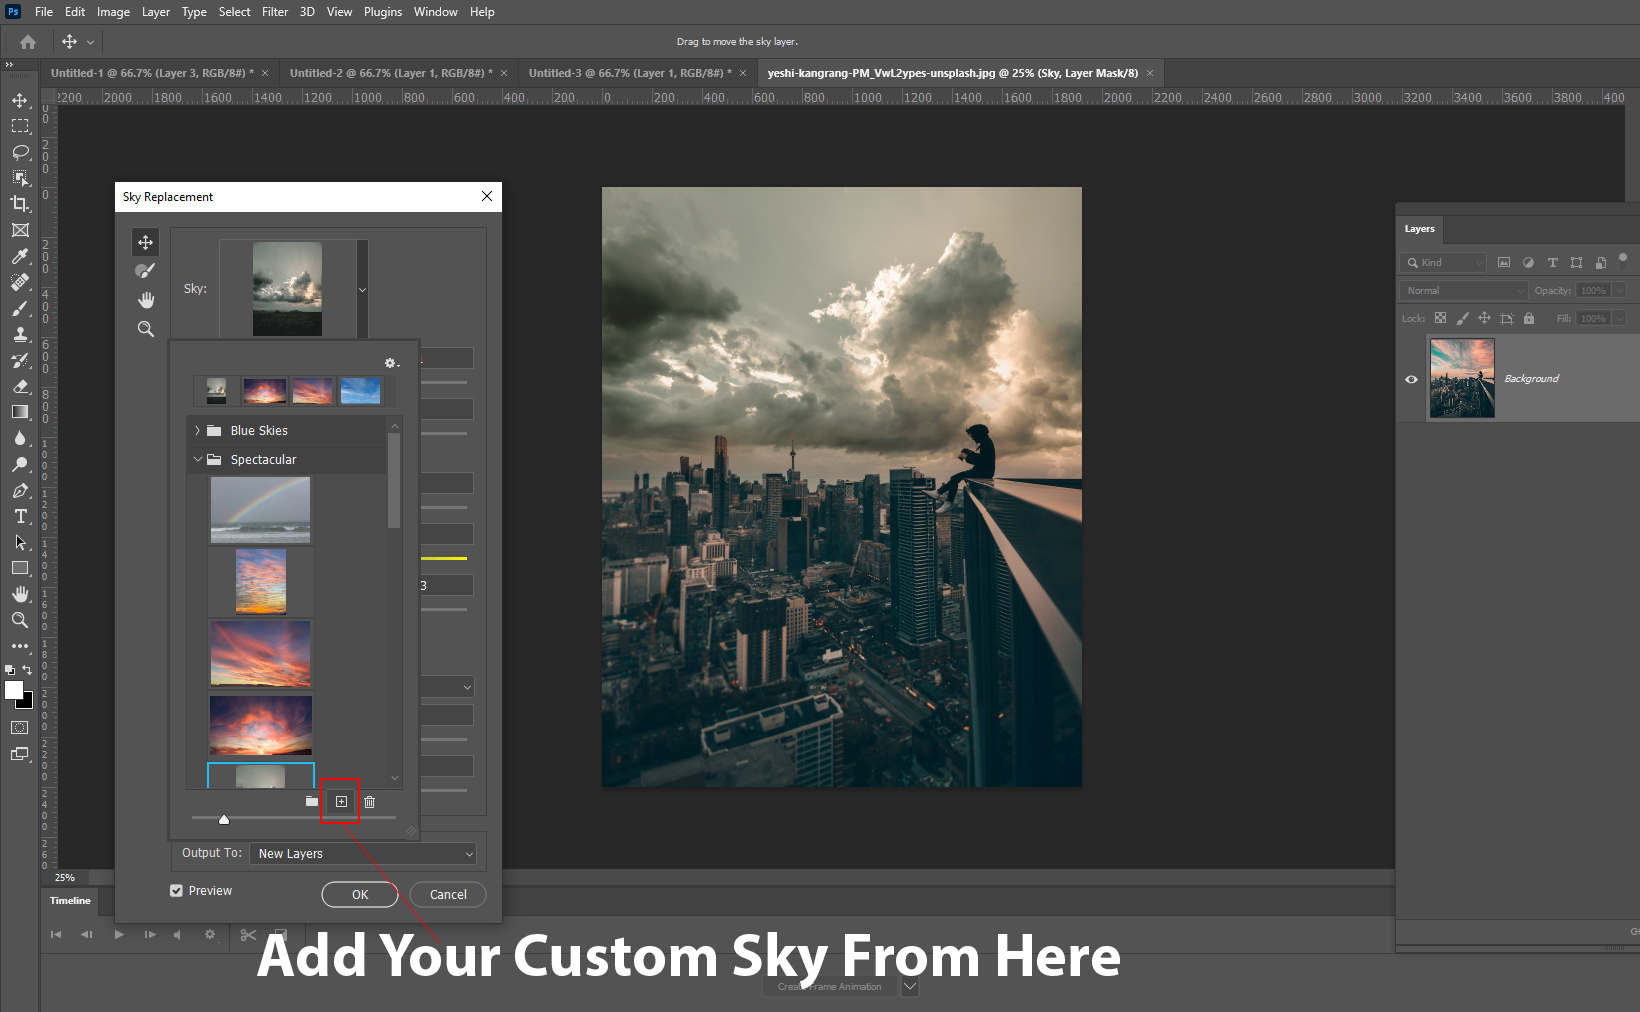
If you don’t like the included skies in the Sky Library, no worries – you can add a custom sky image or any sky image that you think might go well with the image. To add your custom sky, you can click on the Tiny (+) icon at the bottom then select a new sky from your computer and you are done!
Once you are happy with the results you can produce the results by going to Output To: New Layers. Make sure you select New Layers to get all the applied settings as layers.
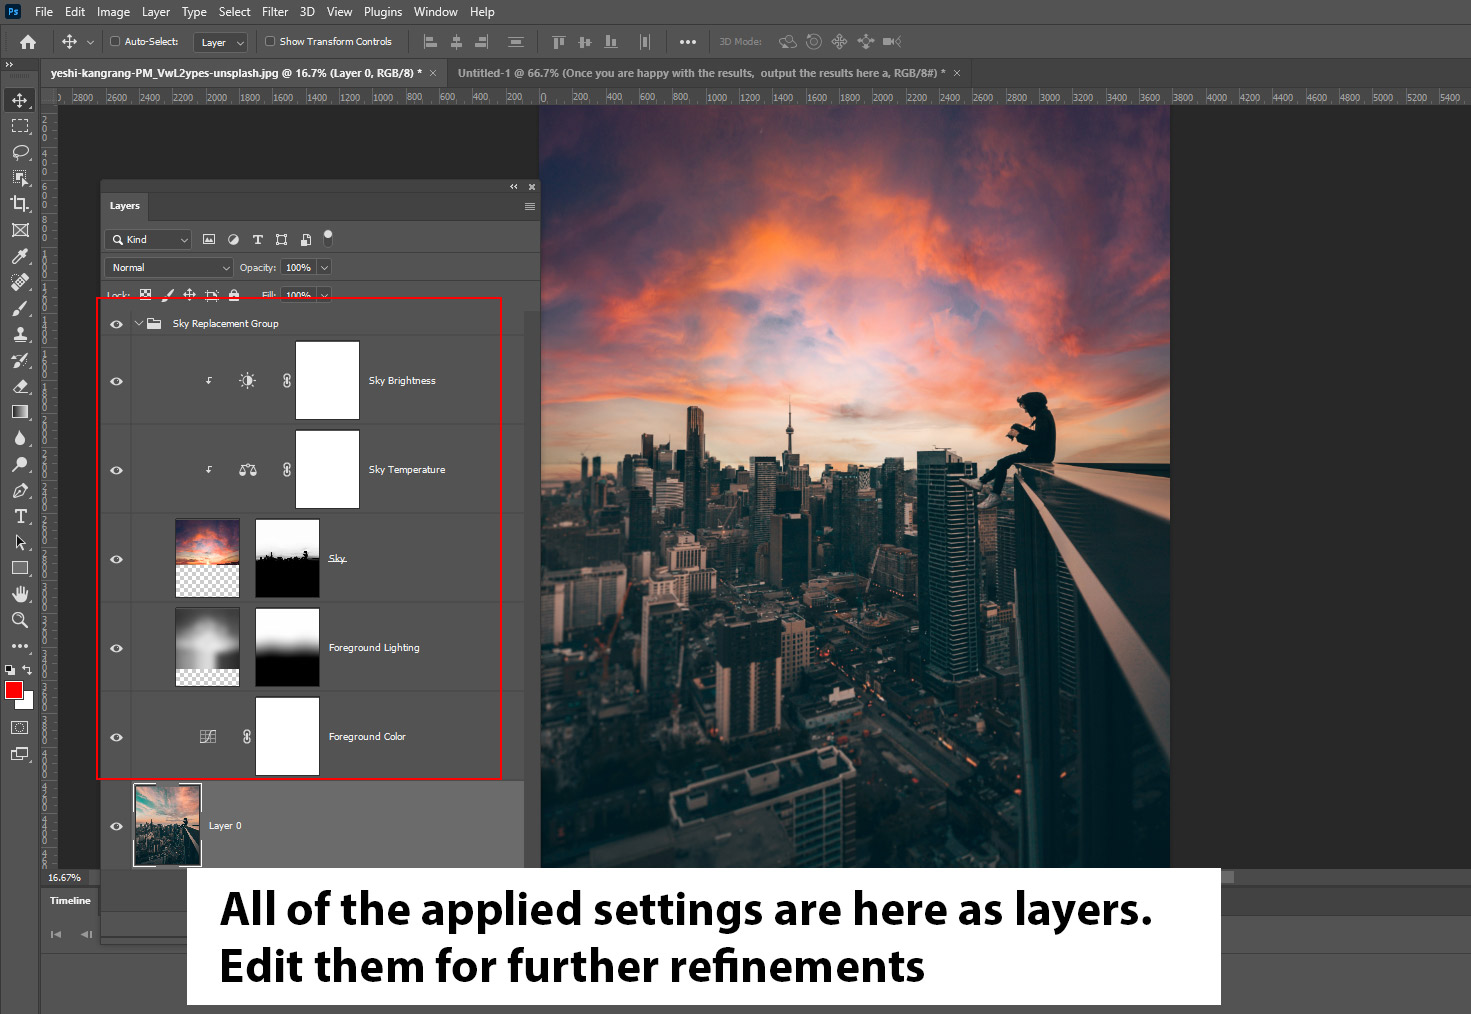
Once you hit ok, you’ll see a group of layers, masks, and adjustment layers containing the settings that we applied to replace the sky. Now you can work individually on these for more precious refinements.
As a photo manipulator, I am loving this filter.
New Feature #2 – Skin Smoothing: Neural Filter
Photoshop added a new filter library known as Neural Filters. These filters use the Adobe Sensei A.I. approach to do editing to your images and they are darn good! Skin Smoothing Filter one of the Neural Filters that will help you get smooth skin in just one click.
Go to Filter > Neural Filters > Featured Filters > Skin Smoothing.
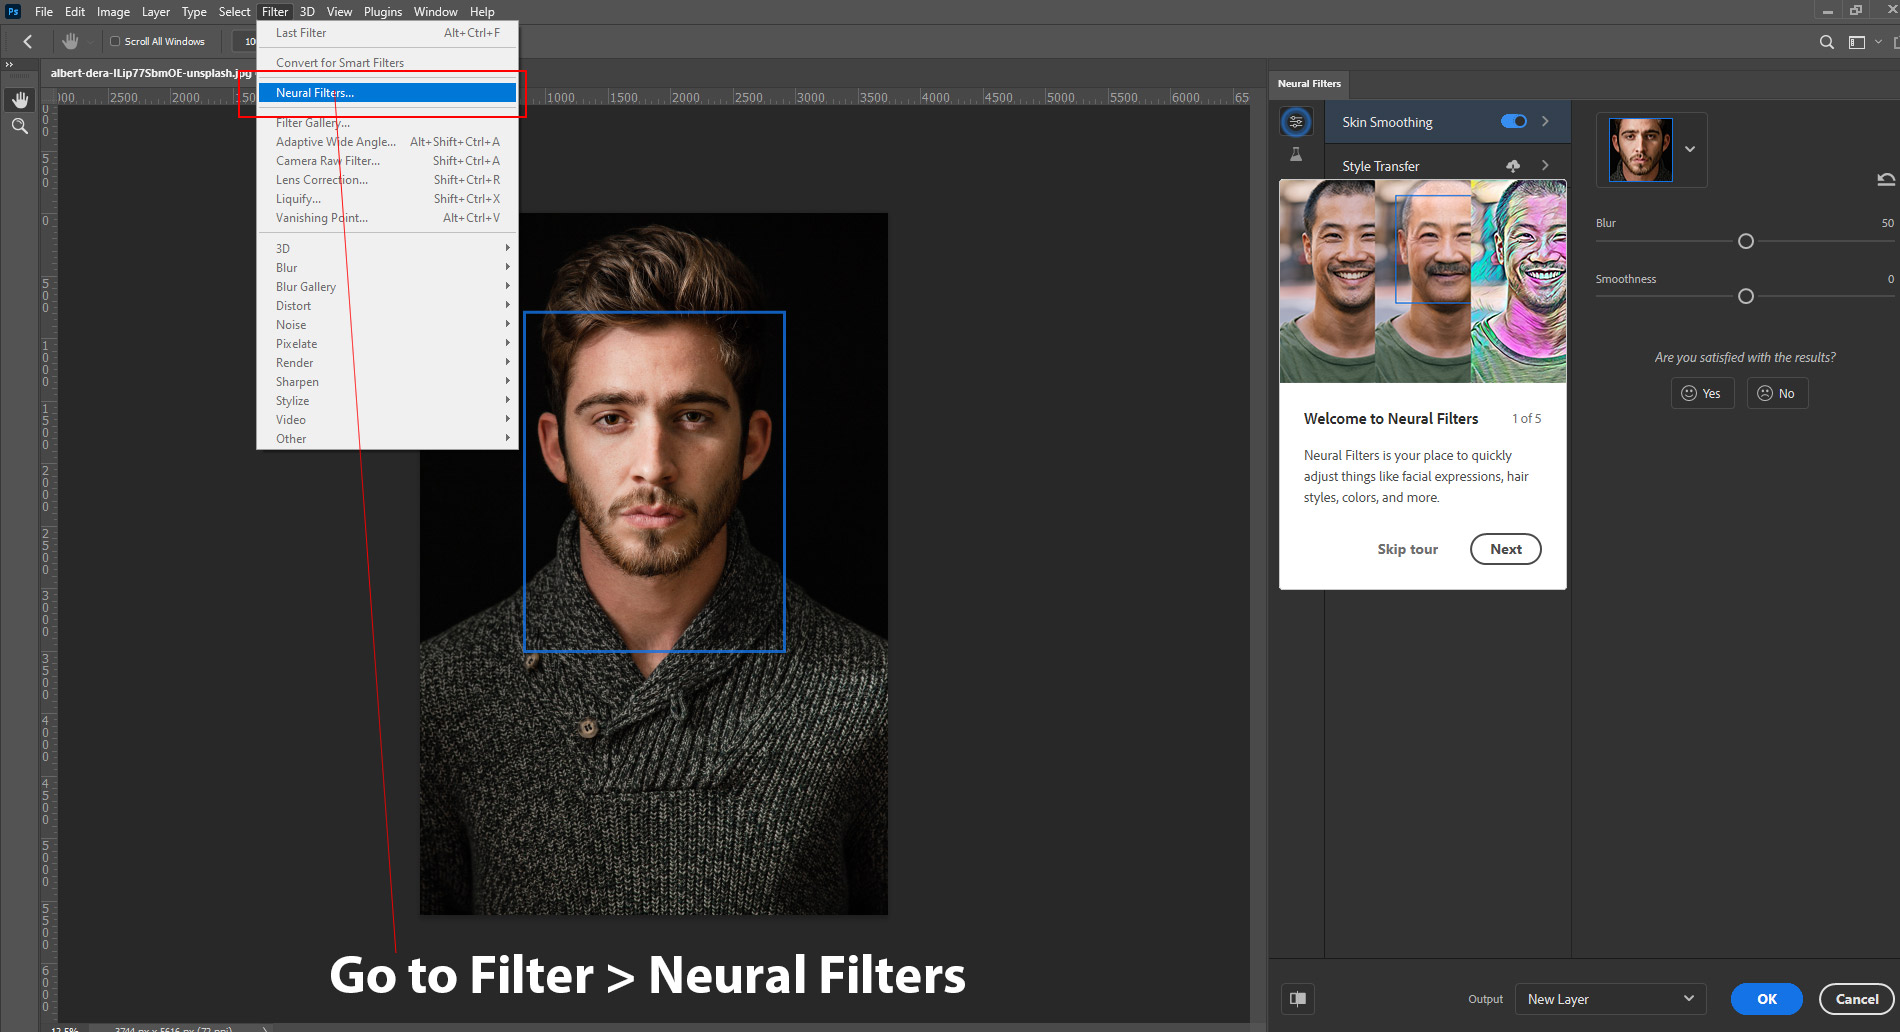
You have 2 sliders to work with Blur & Smoothness. Blur controls the texture of the skin and Smoothness softens the skins. My preferred way is to be on the lower side of Blur and increase the Smoothness slider to soften the skin tones.
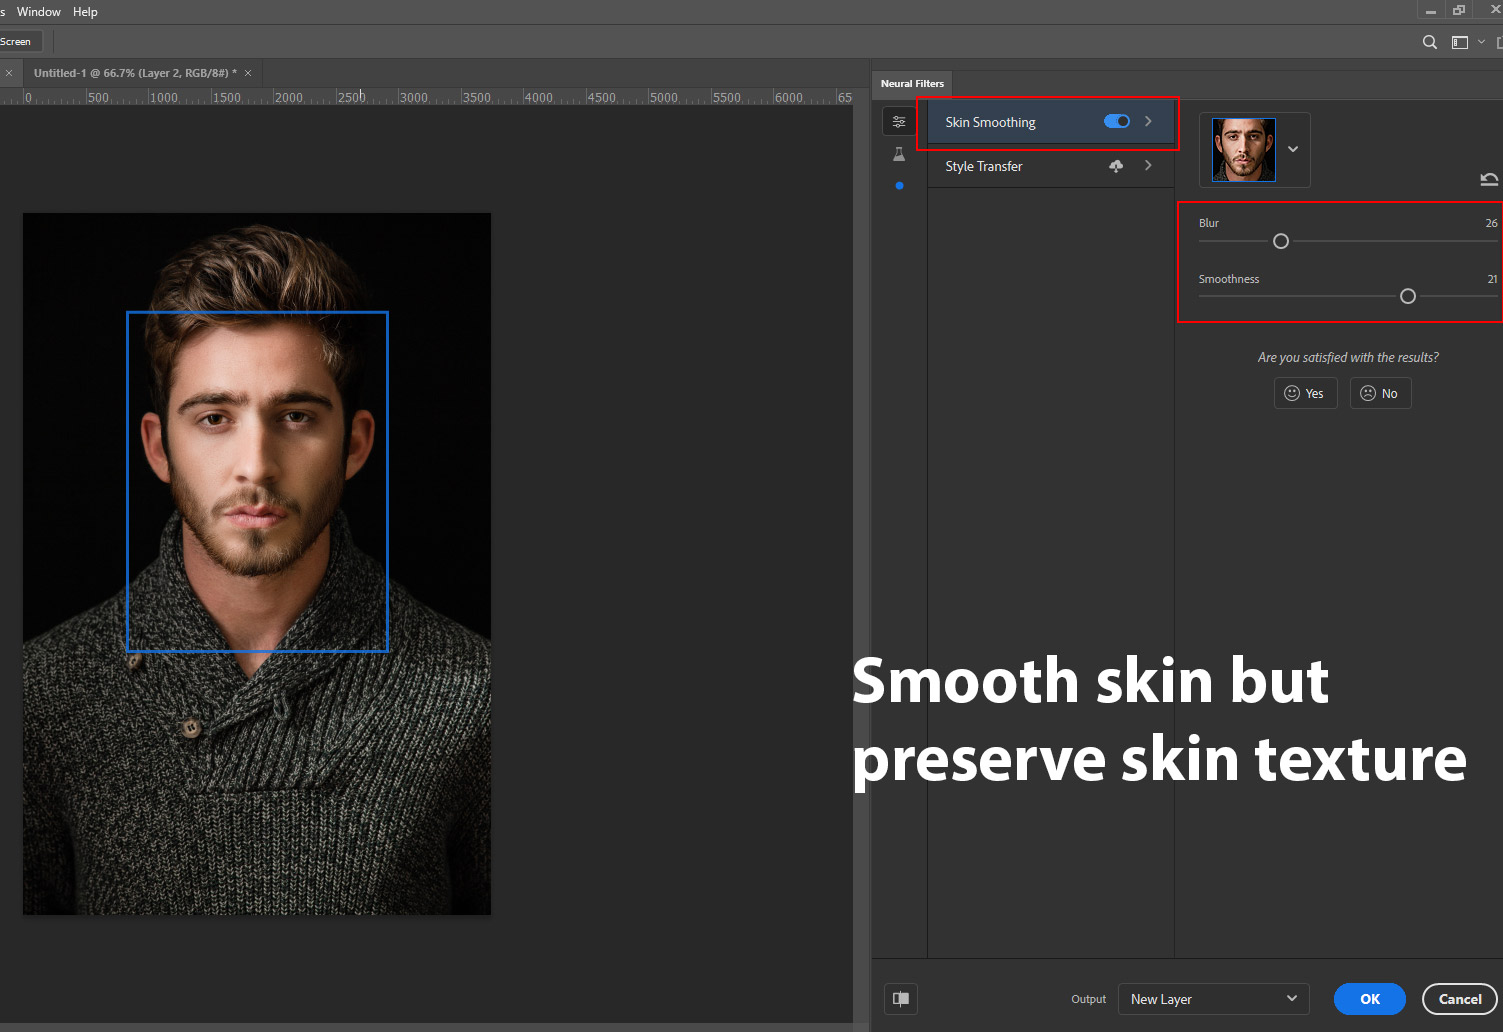
Here you can see the before and after results:
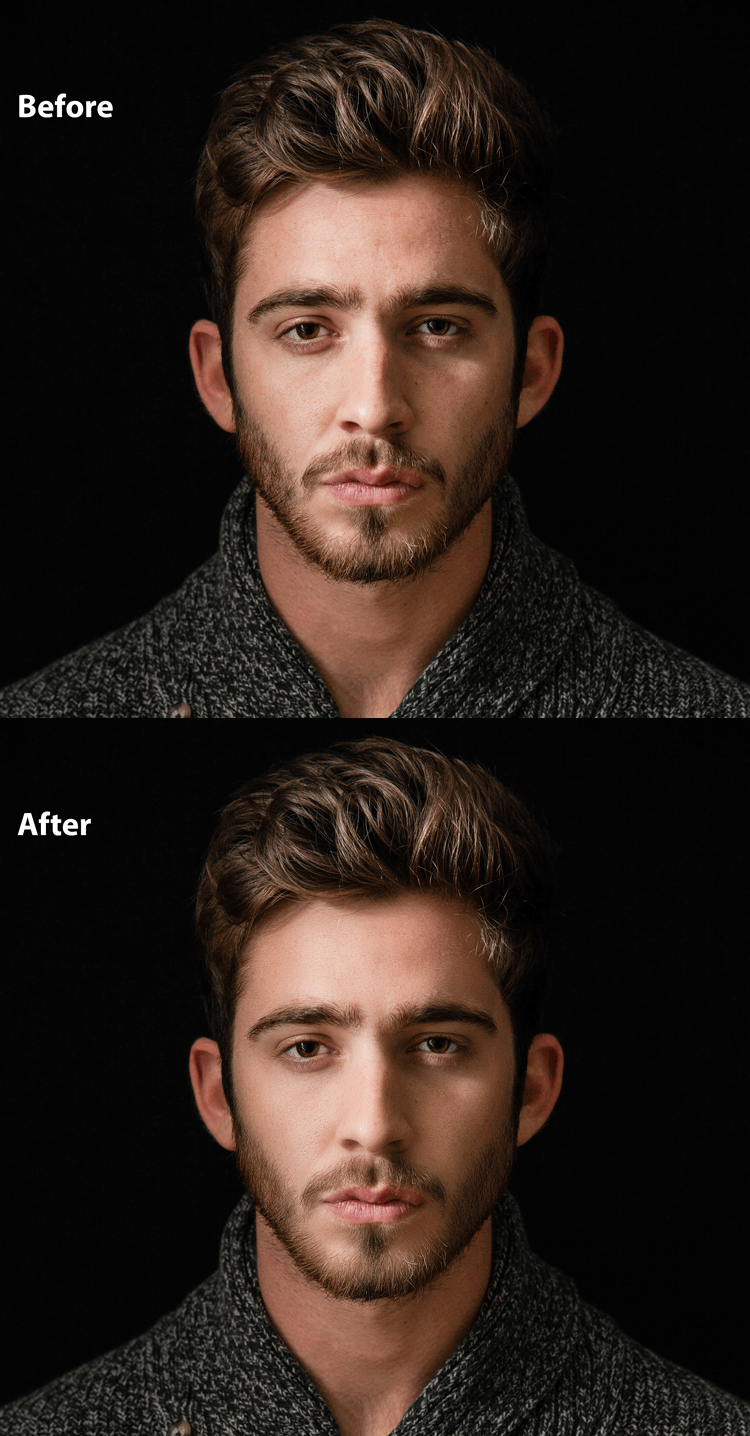
Not big improvements but good to begin with at least!
New Feature #3 – Smart Portrait: Neural Filter
This filter is fun to work with and it is self-explanatory. You can make people look old, young, angry, happy, and surprised. We also have options for hair, light, and head. I recommend that you play around with the settings to see what is possible.
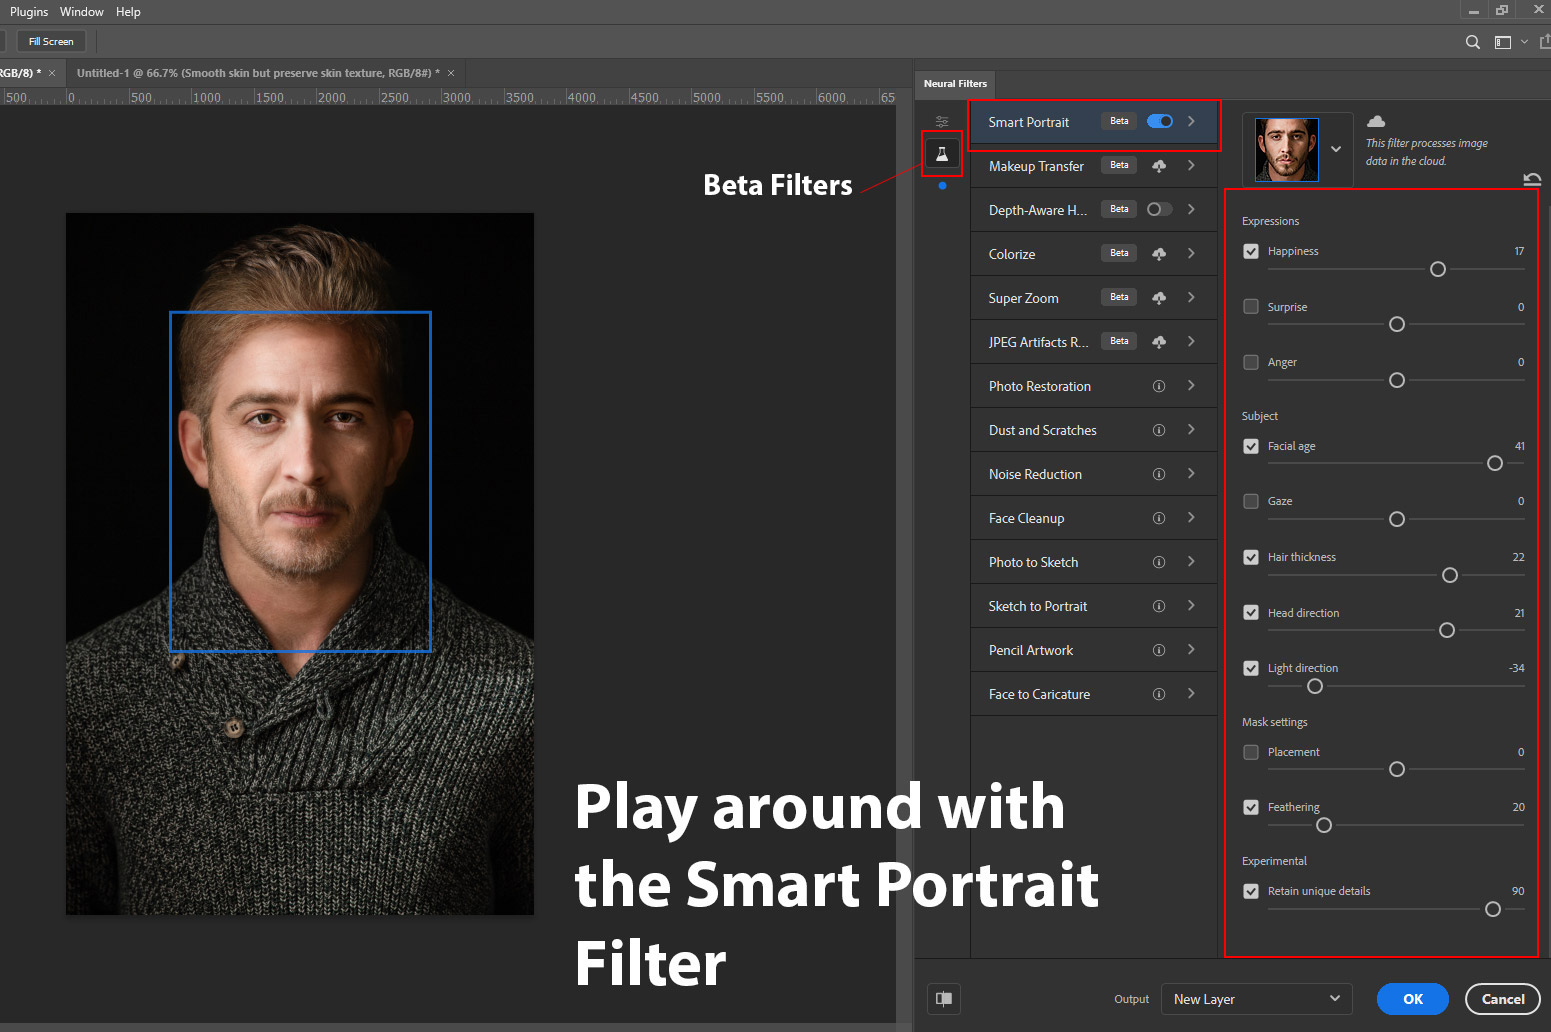
Here what I did with the subject:
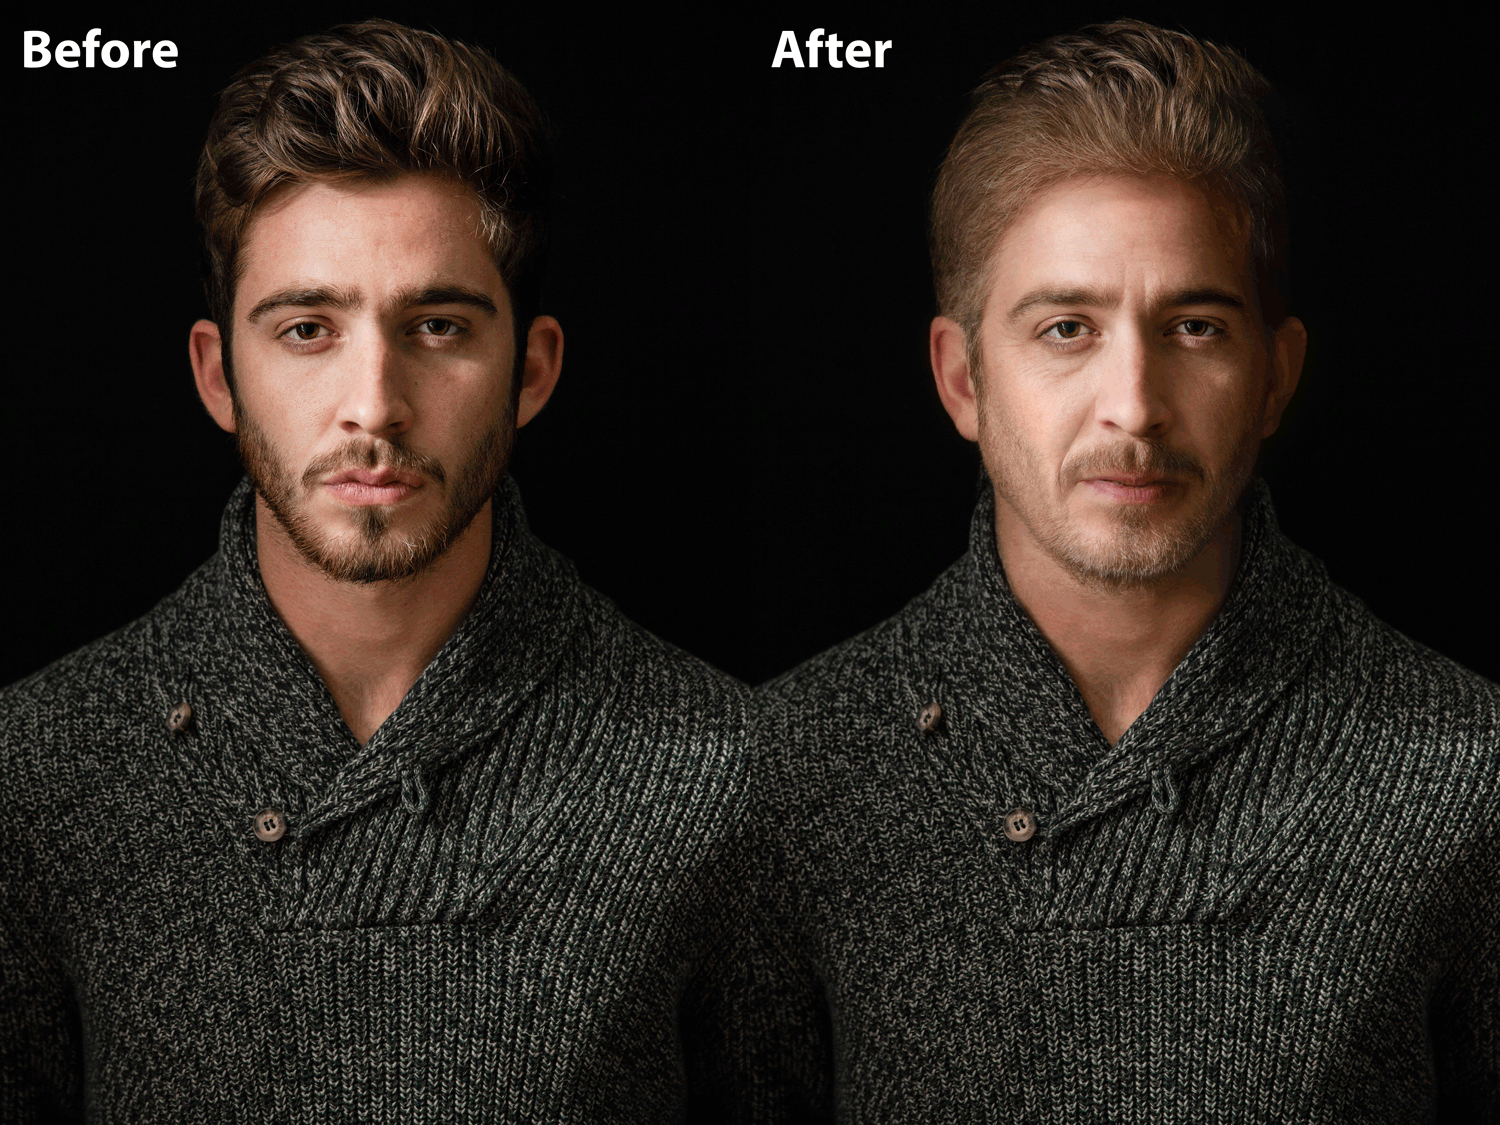
New Feature #4 – Colorize: Neural Filter
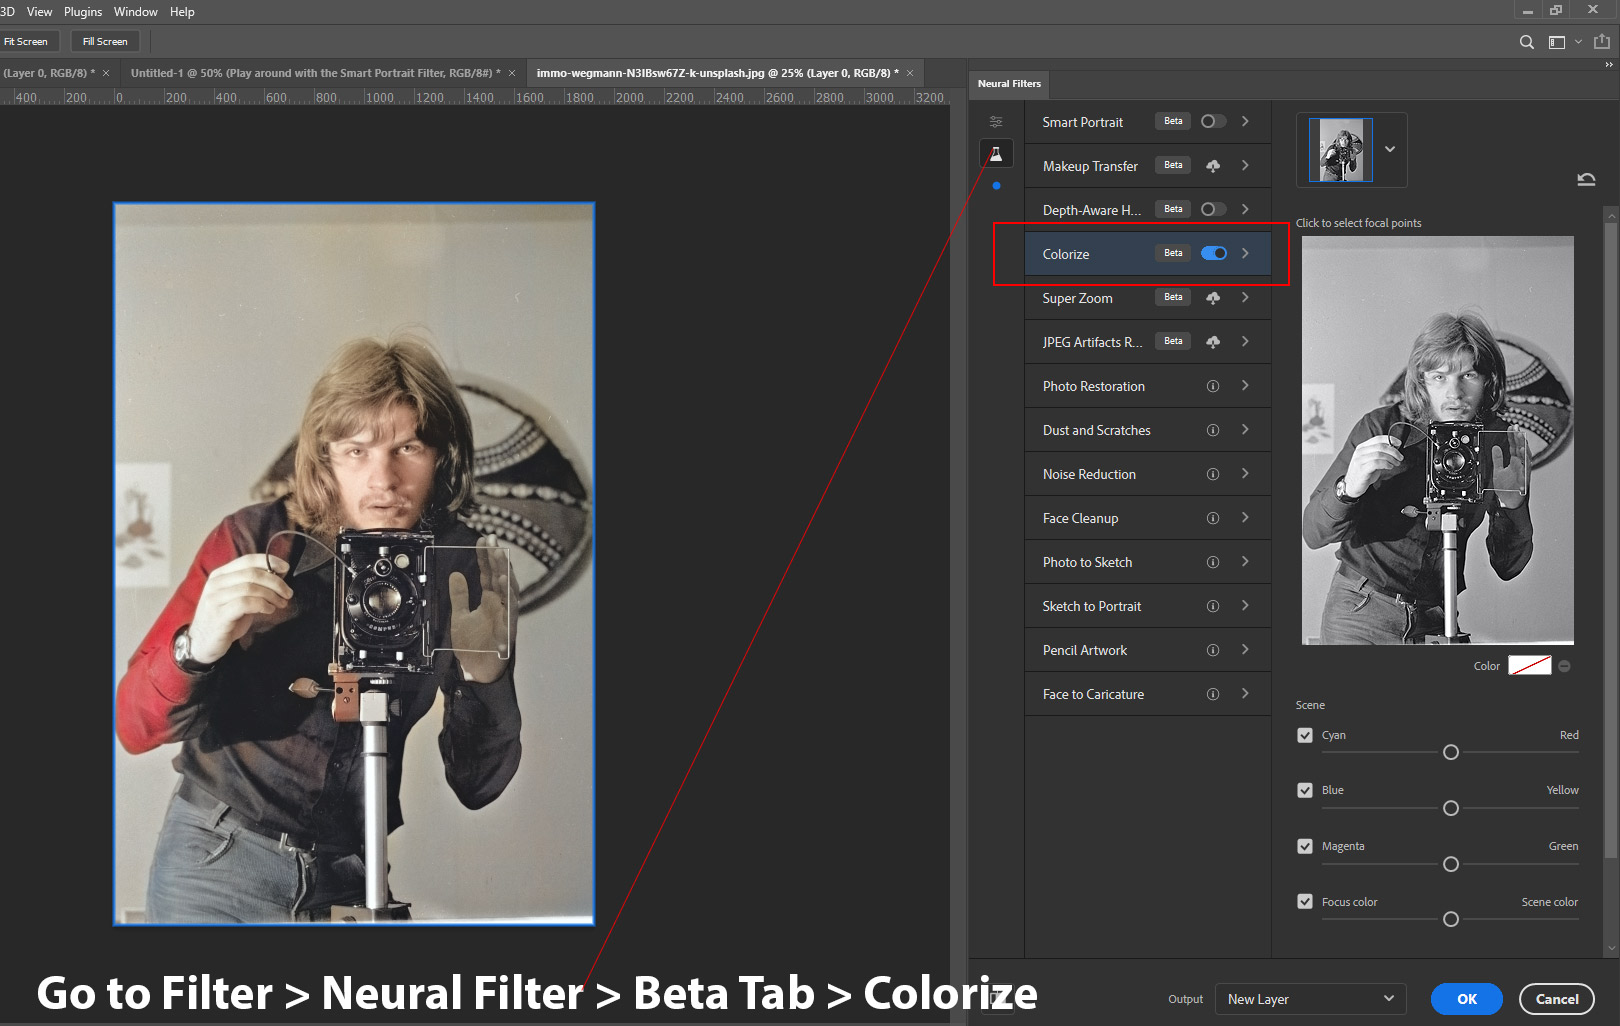
Another cool feature in New Photoshop 2021 is Colorize Filter. It promises to colorize black/white photos in just one click and it is really good at coloring black/white photos. If you have a vintage photo give this filter a shot.
As soon as I turned on the Colorize Filter it colorized the photo and you can see the results below.
Also, make sure that you are working on RGB Mode, otherwise, this filter may not work.
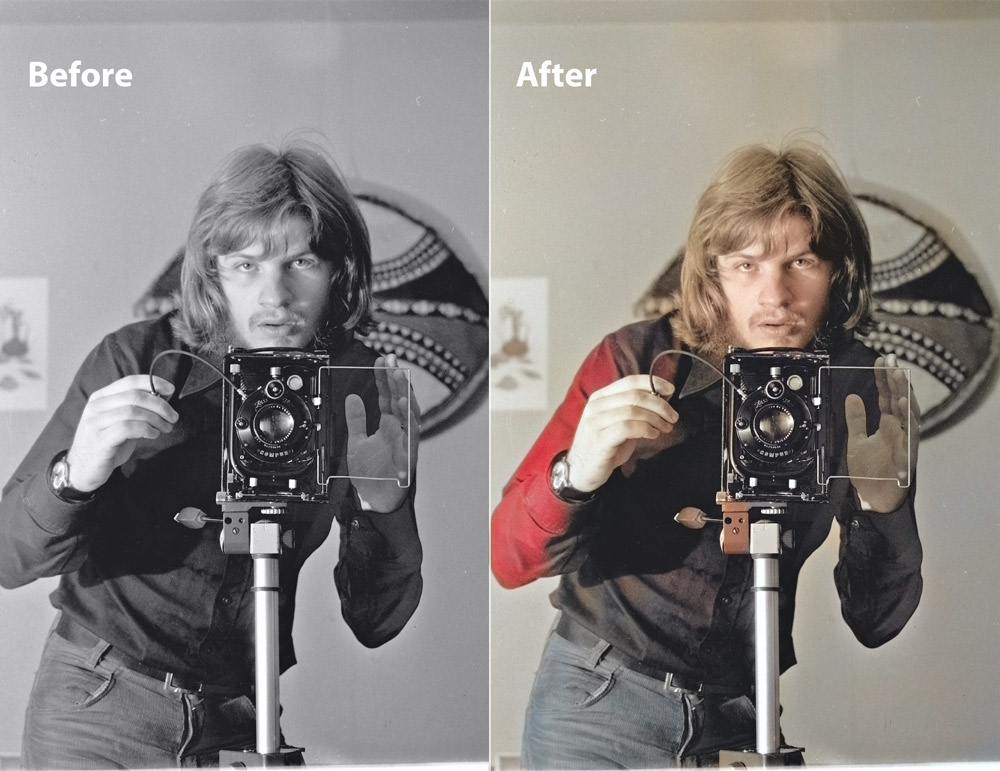
See the before & after results:
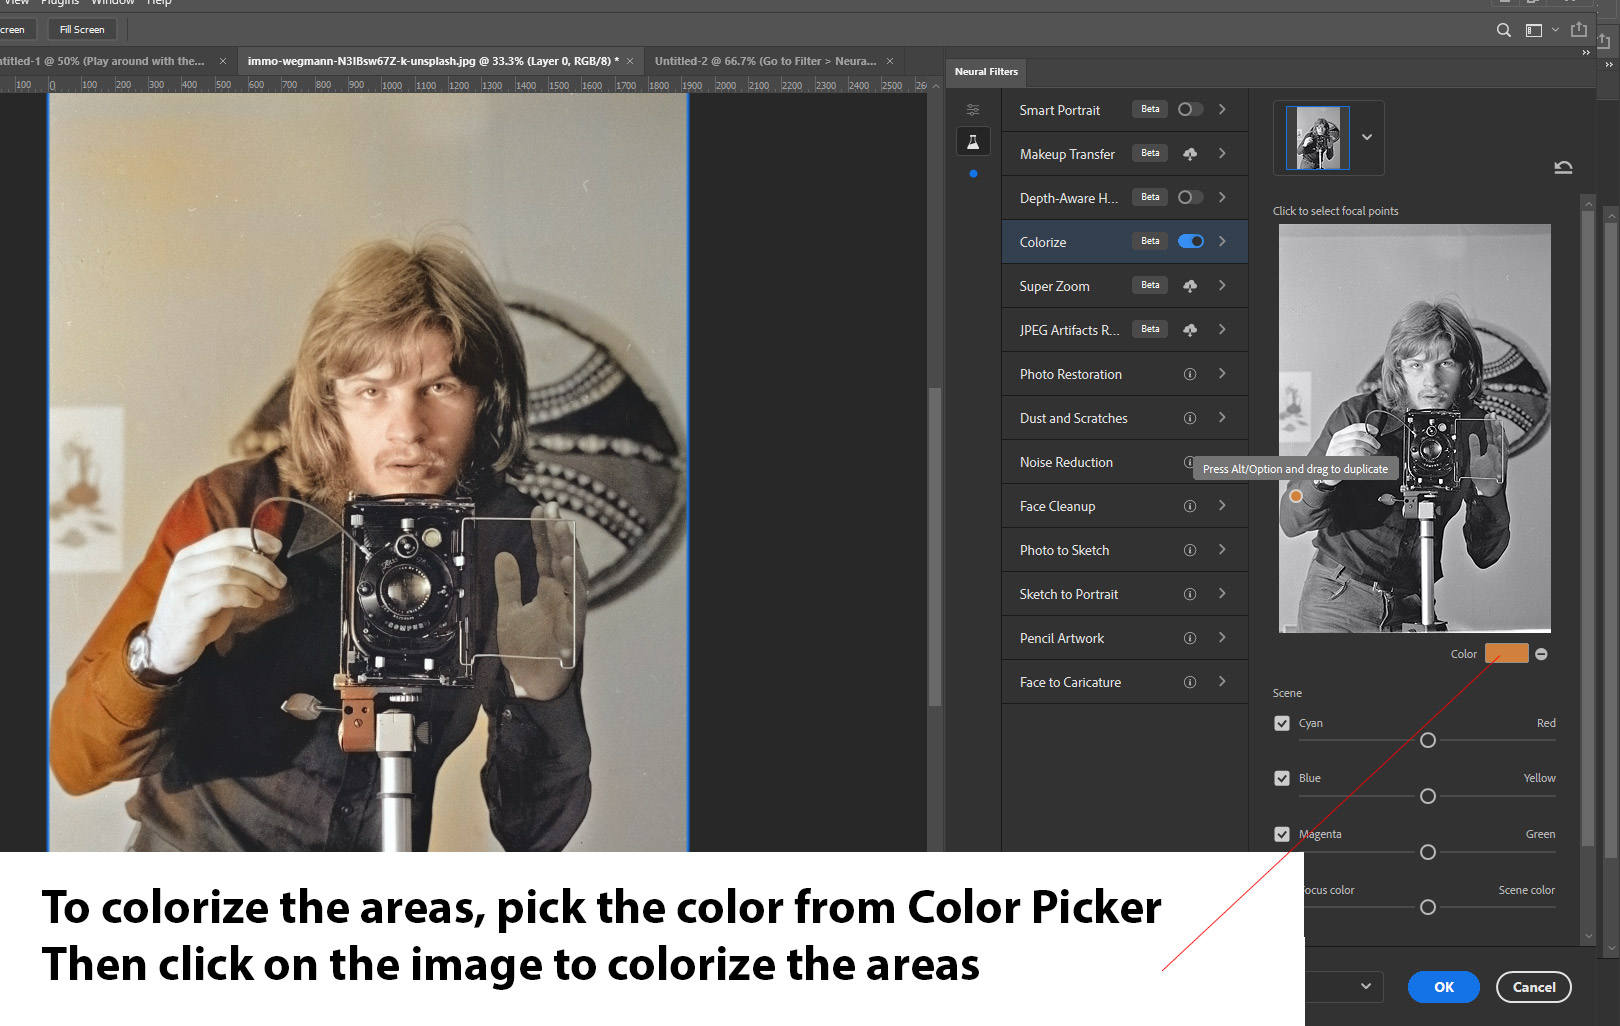
If you wish to colorize a certain area, you can do so by clicking the Color Box. First, click on the color box and then select a color from the color picker, once you selected the color, click on the area of the image which you’d like to colorize with your chosen color. You can see the dot icon appearing in the image telling you the location where the selected color has been applied.
To add more coloring points, you can press ALT/OPTION + Click on the image.
New Feature #5 – Reset Smart Objects
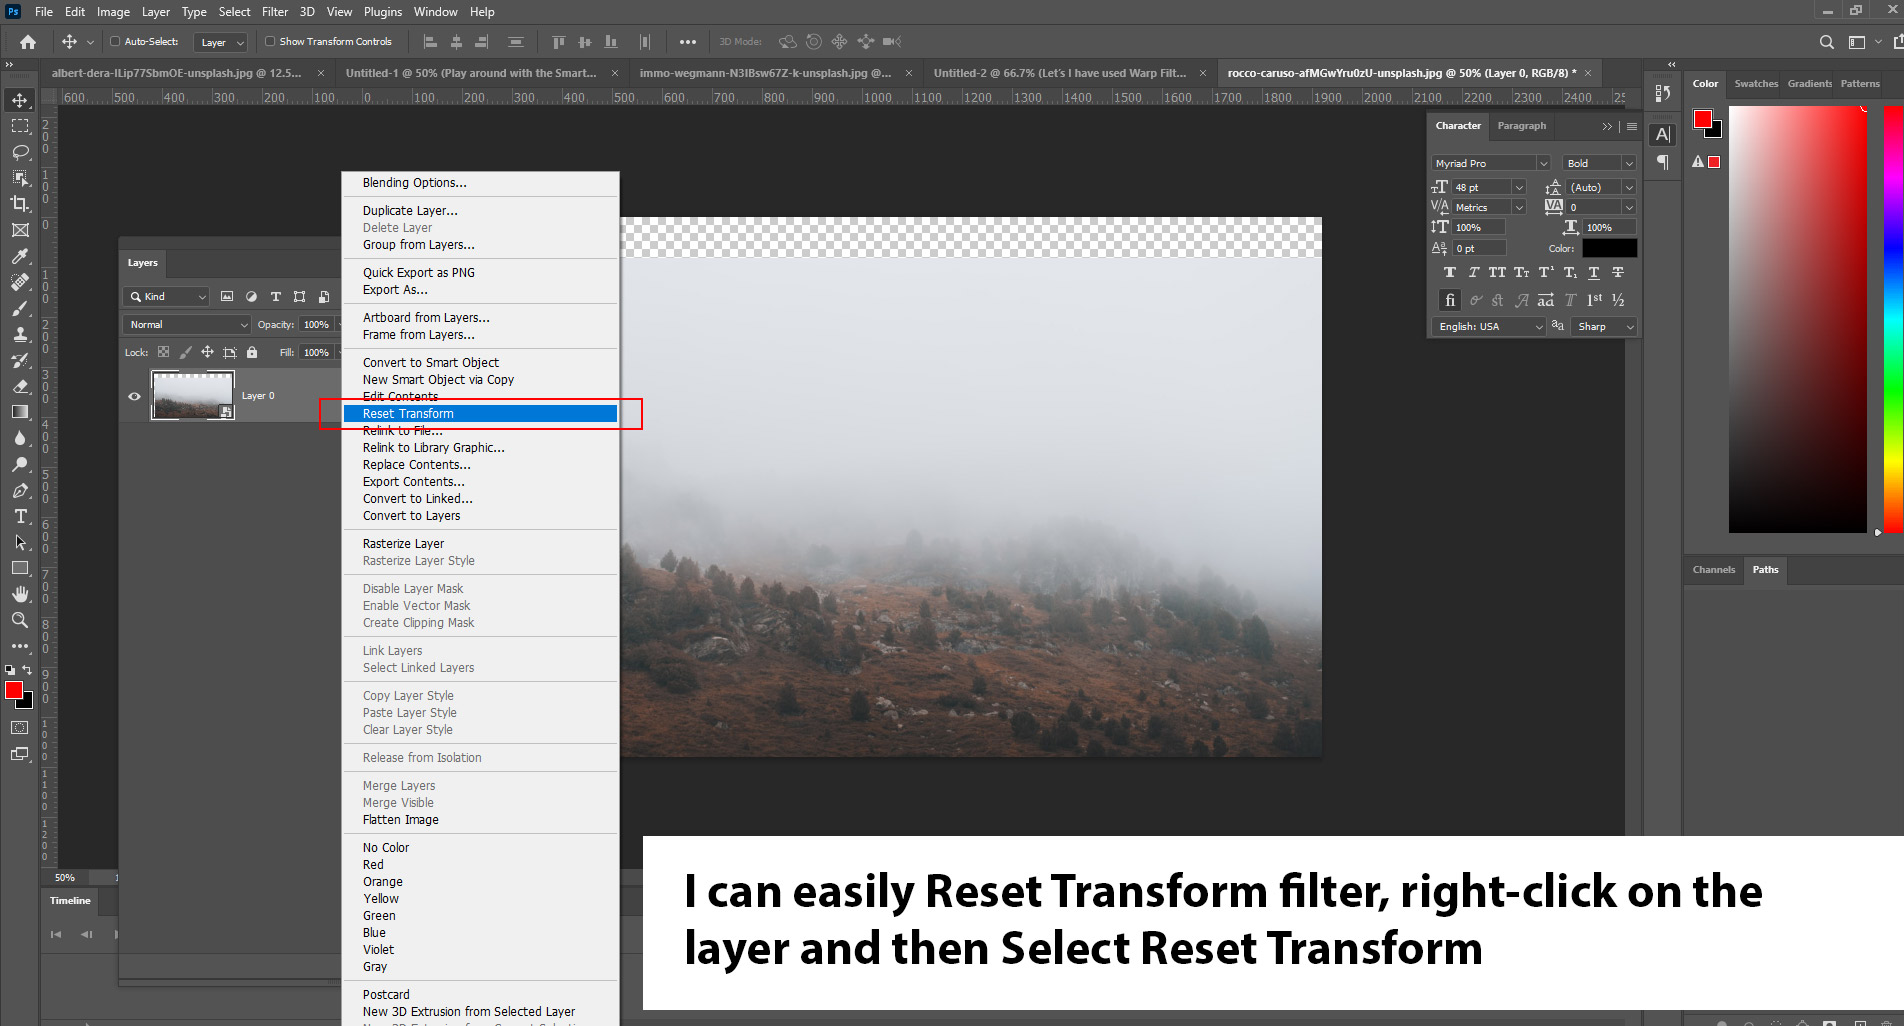
Now Photoshop CC allows you to reset smart objects with its new feature called “Reset Transform”. This is a lifesaver for me. I usually use Warp Filter a lot and I did the same with the below image to change the shape.
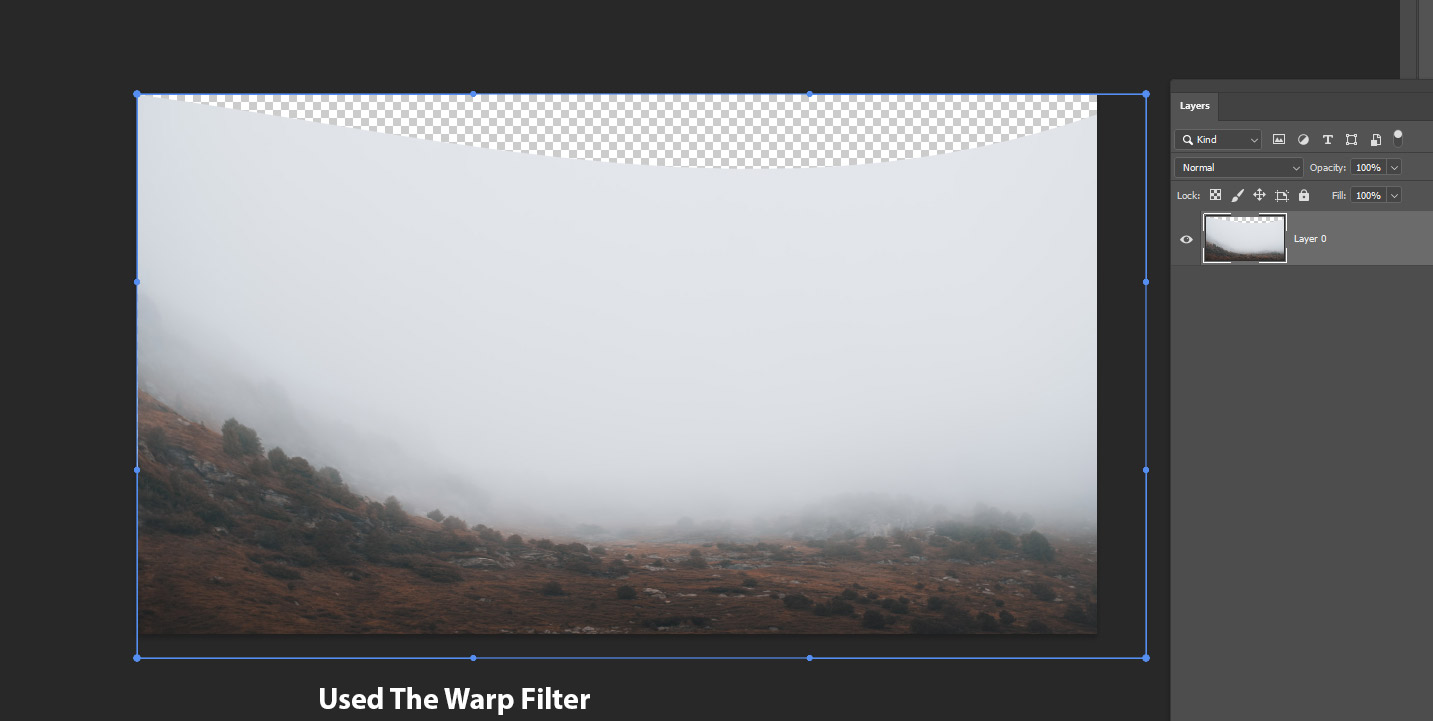
I can reset the Warp Filter by right-clicking on the image then select Reset Transform.
New Feature #6 – Pattern Preview
This filter will benefit graphic designers and you can create seamless patterns using the Pattern Preview Feature. Go to View > Pattern Preview to activate it and start creating your patterns such as I did below. It’s probably not as cool as you very talented graphic artists will create, but good enough for an example.
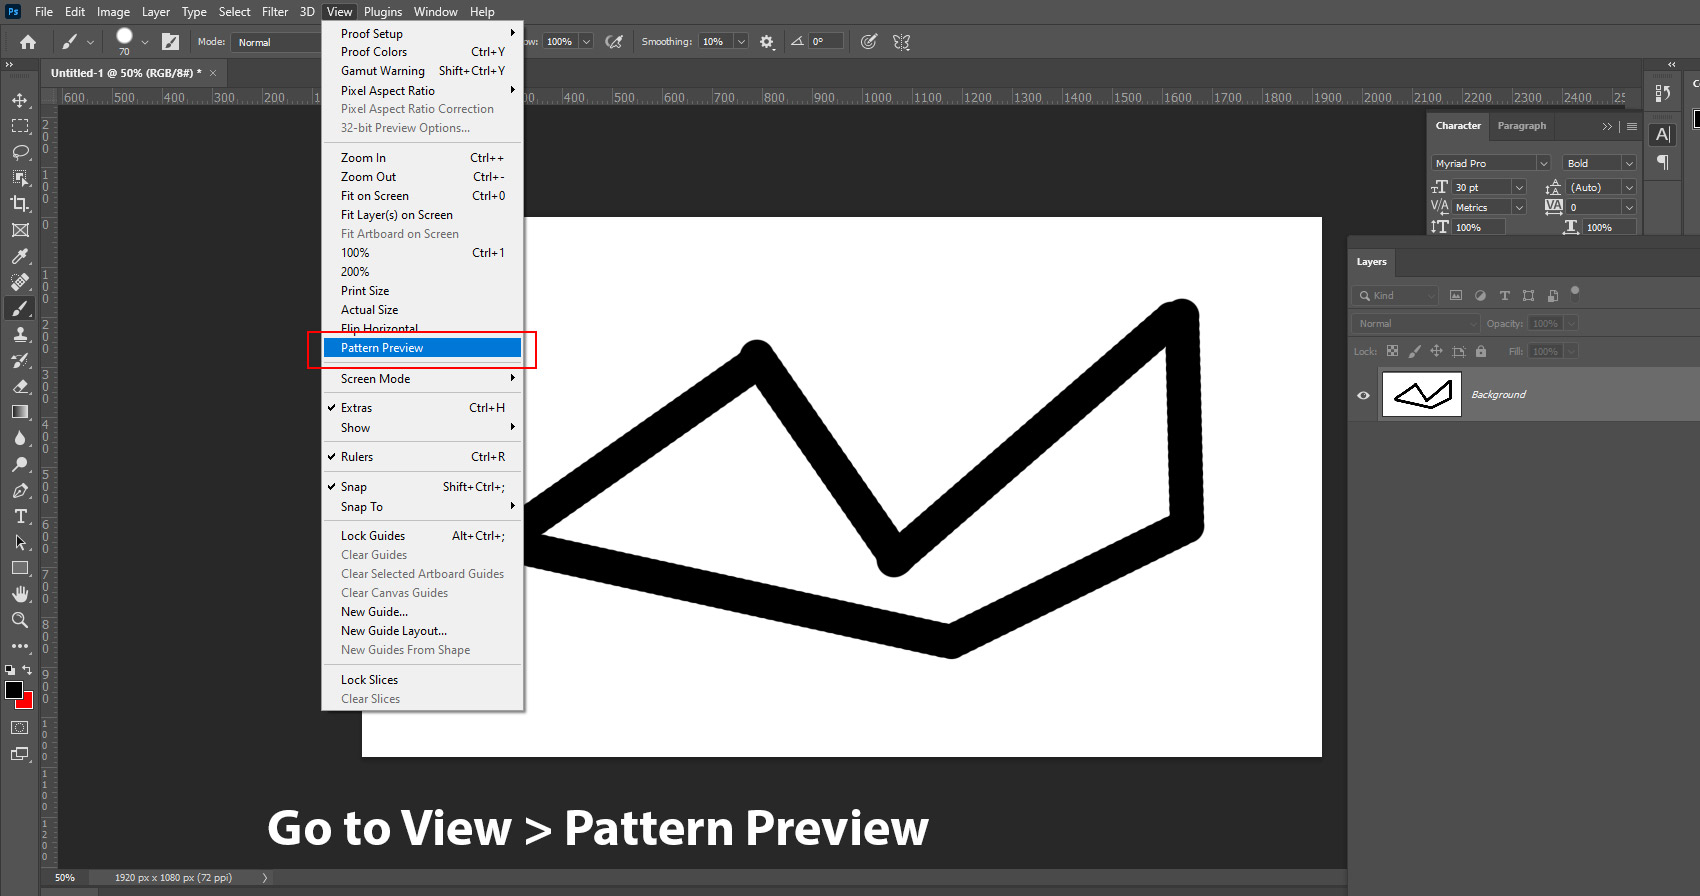
As you start creating patterns it will create patterns seamlessly and you can notice how the patterns are joining each other.
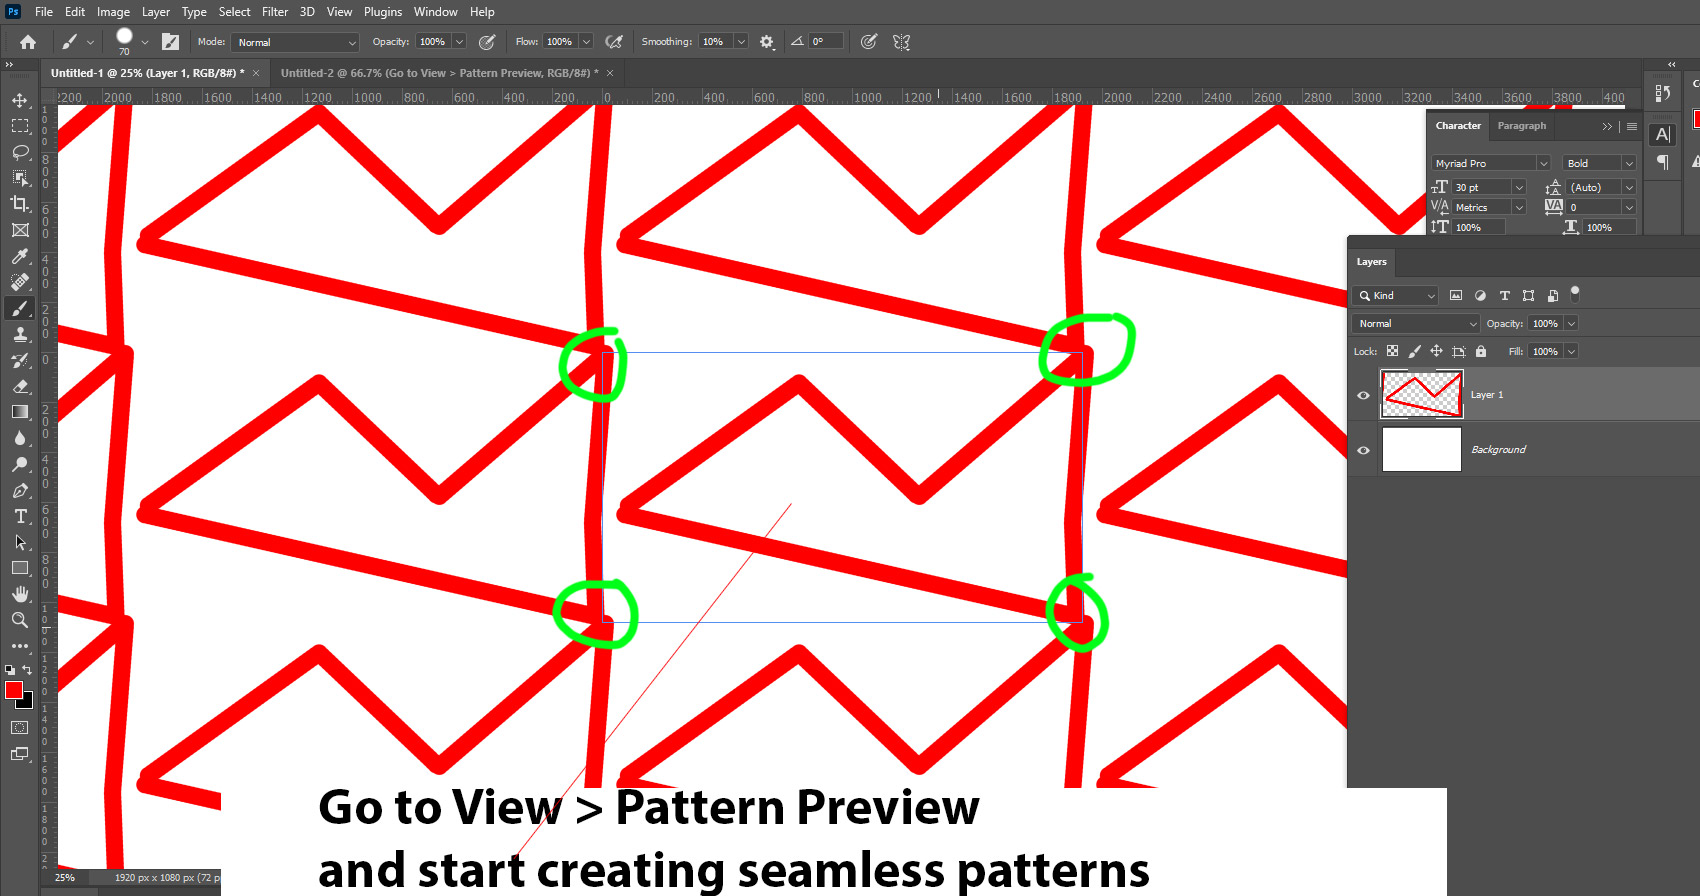
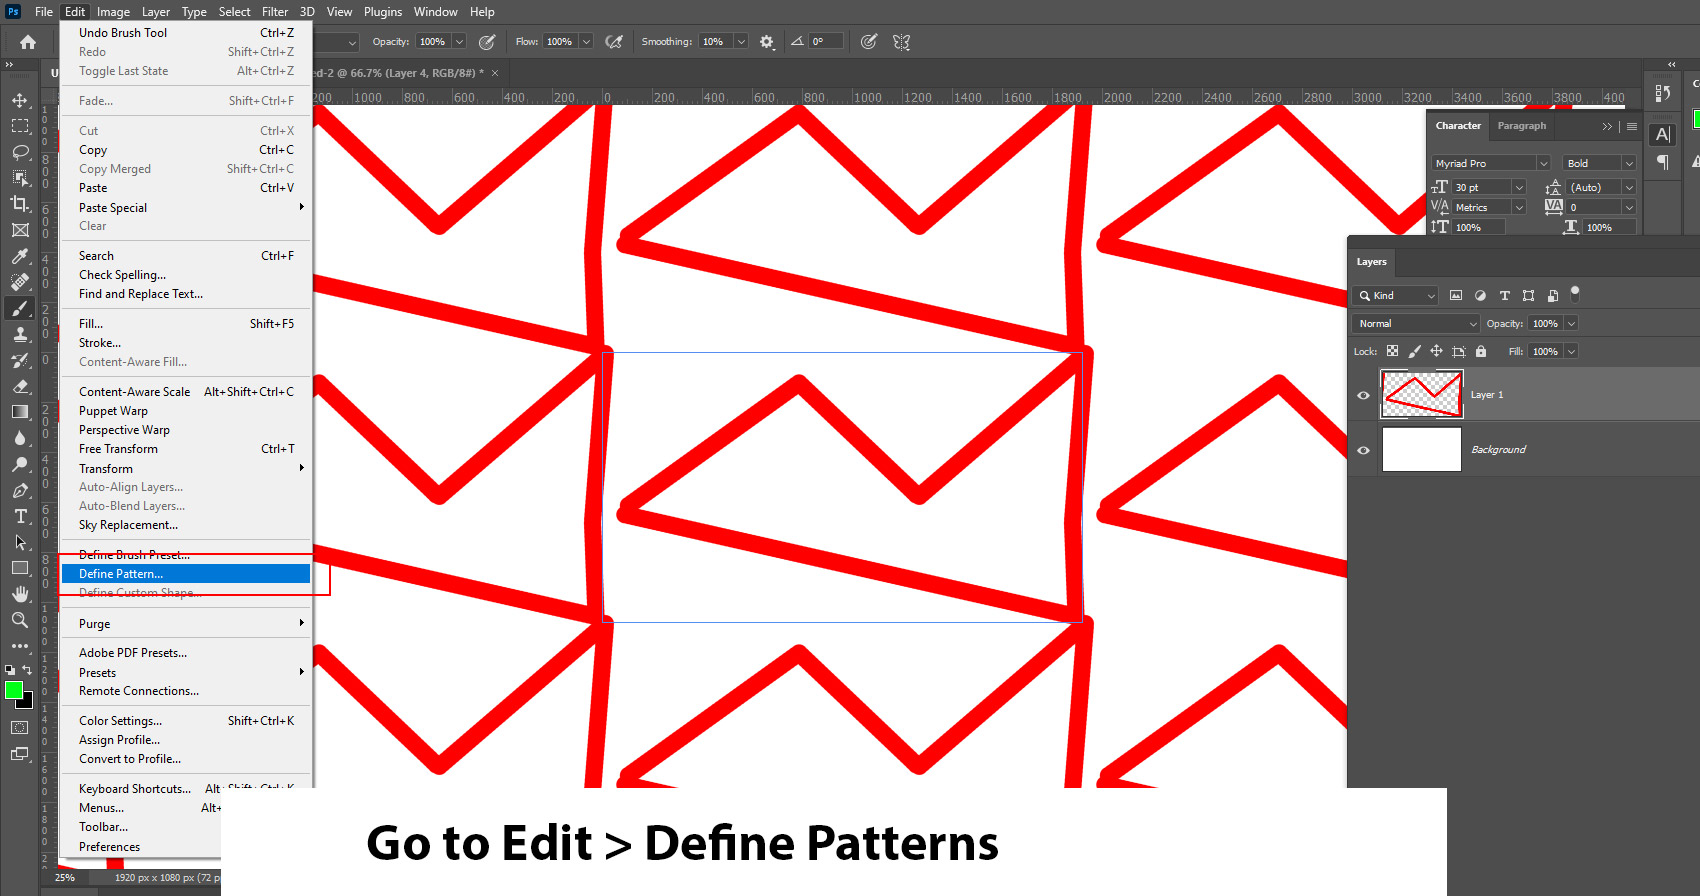
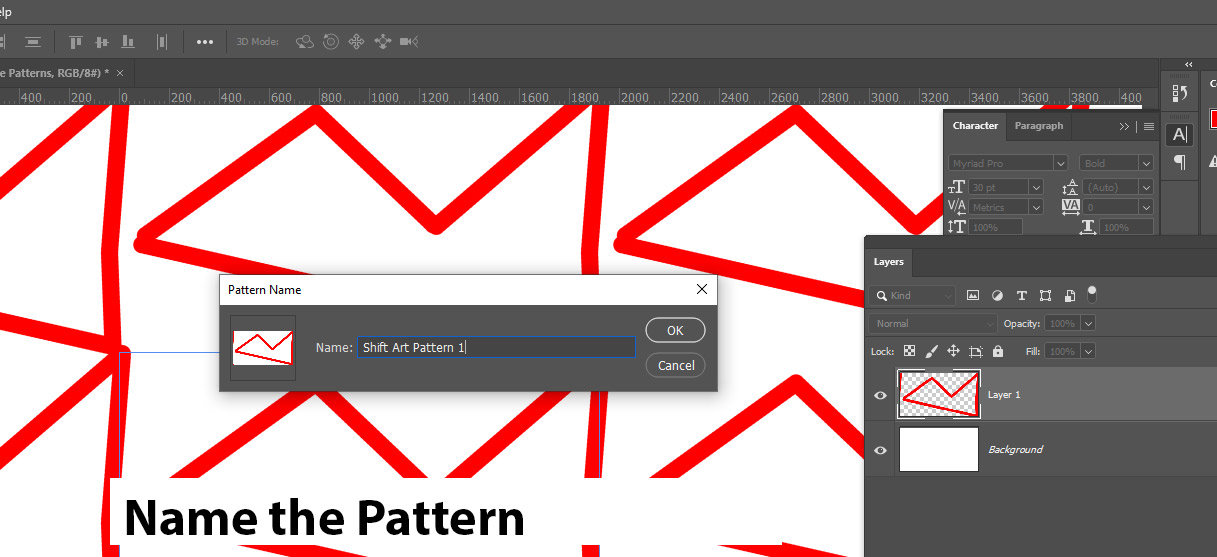
Once you have created your new patterns, go to Edit > Define Patterns:
Name the pattern:
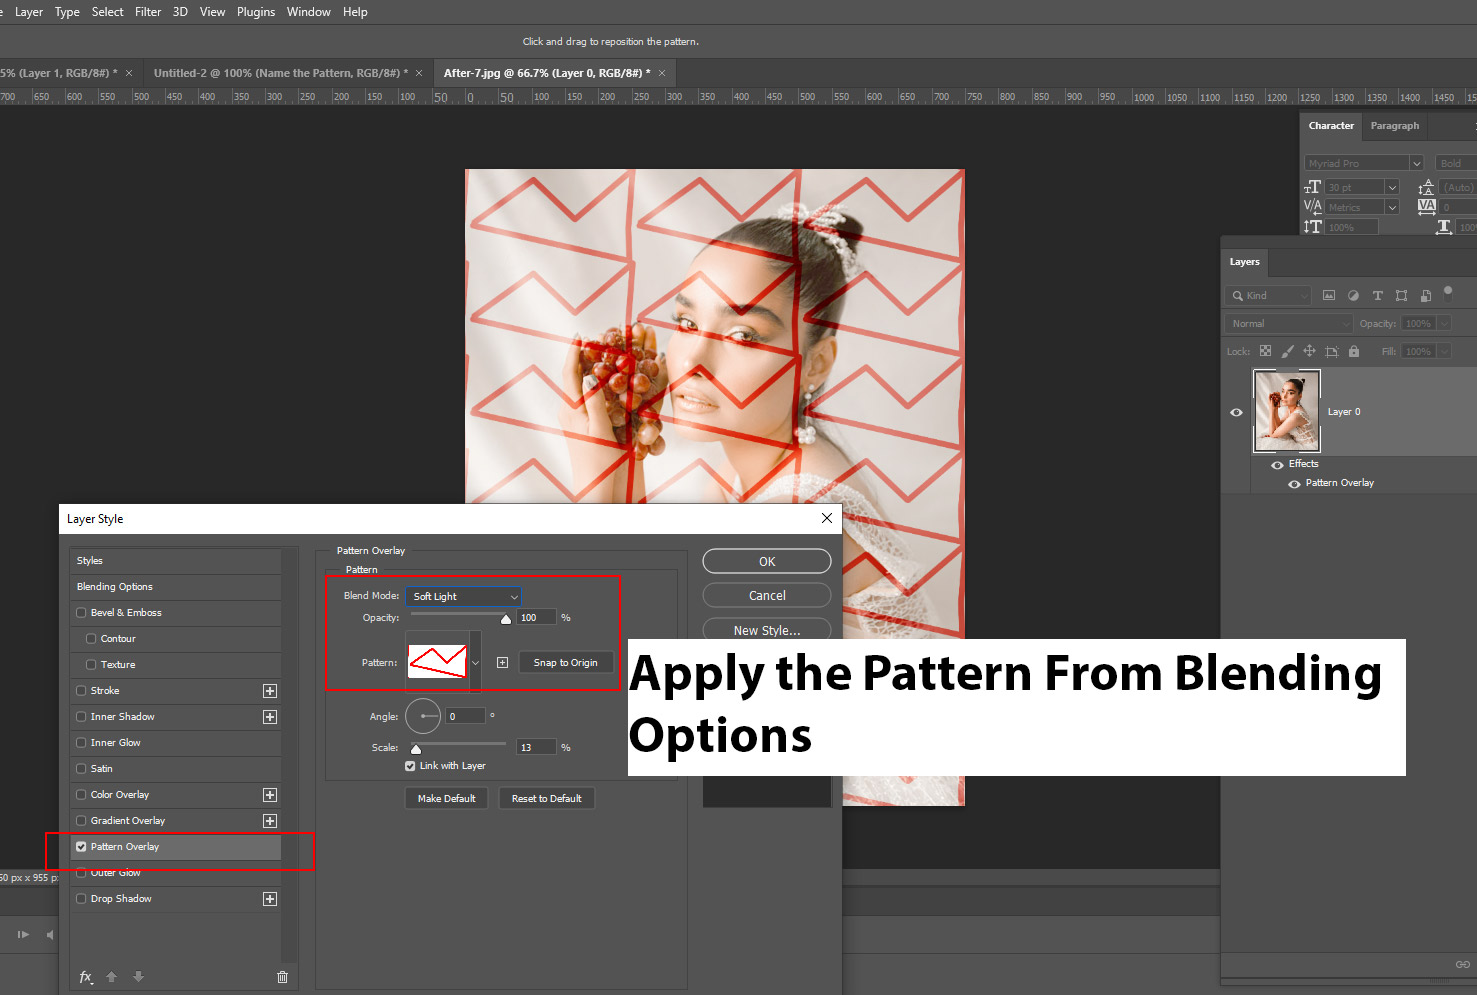
Apply the pattern from Blending Options:
New Feature #7 – Live Shape Enhancements
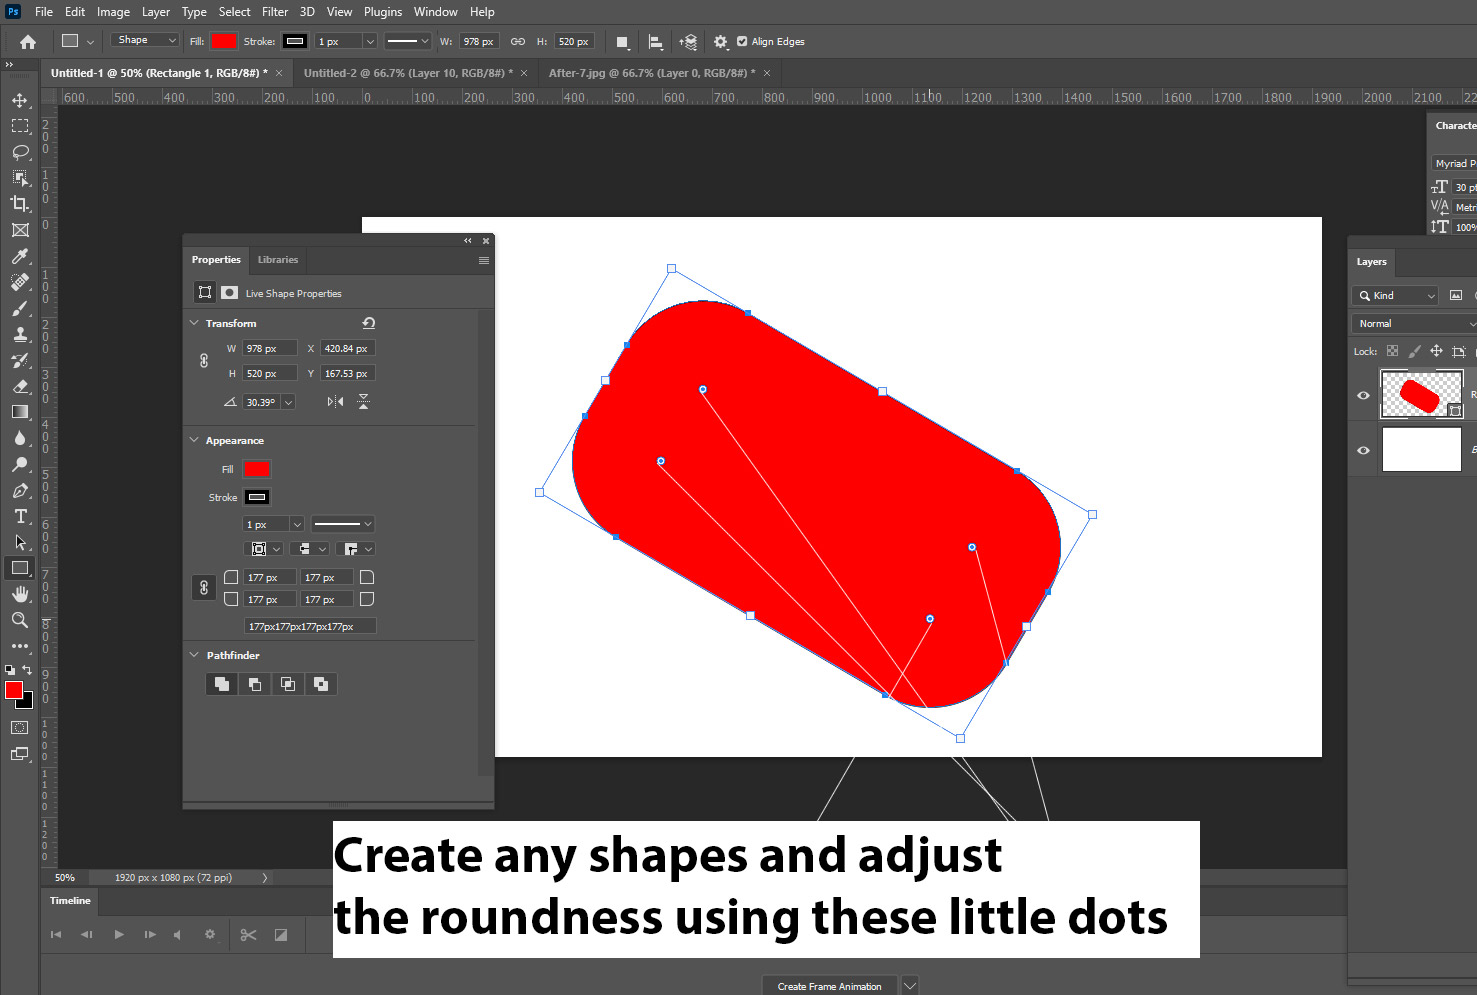
You can modify any shape in Photoshop such as you can make the corners of a rectangular shape more rounded and, control width & height, and so on.
New Feature #8 – Improved Select & Mask
The Select & Mask has been improved with two new features Refine Hair, and Coolor & Object Aware Modes. You can now select subjects inside the Select & Mask interface.
Go to Select > Select & Mask:
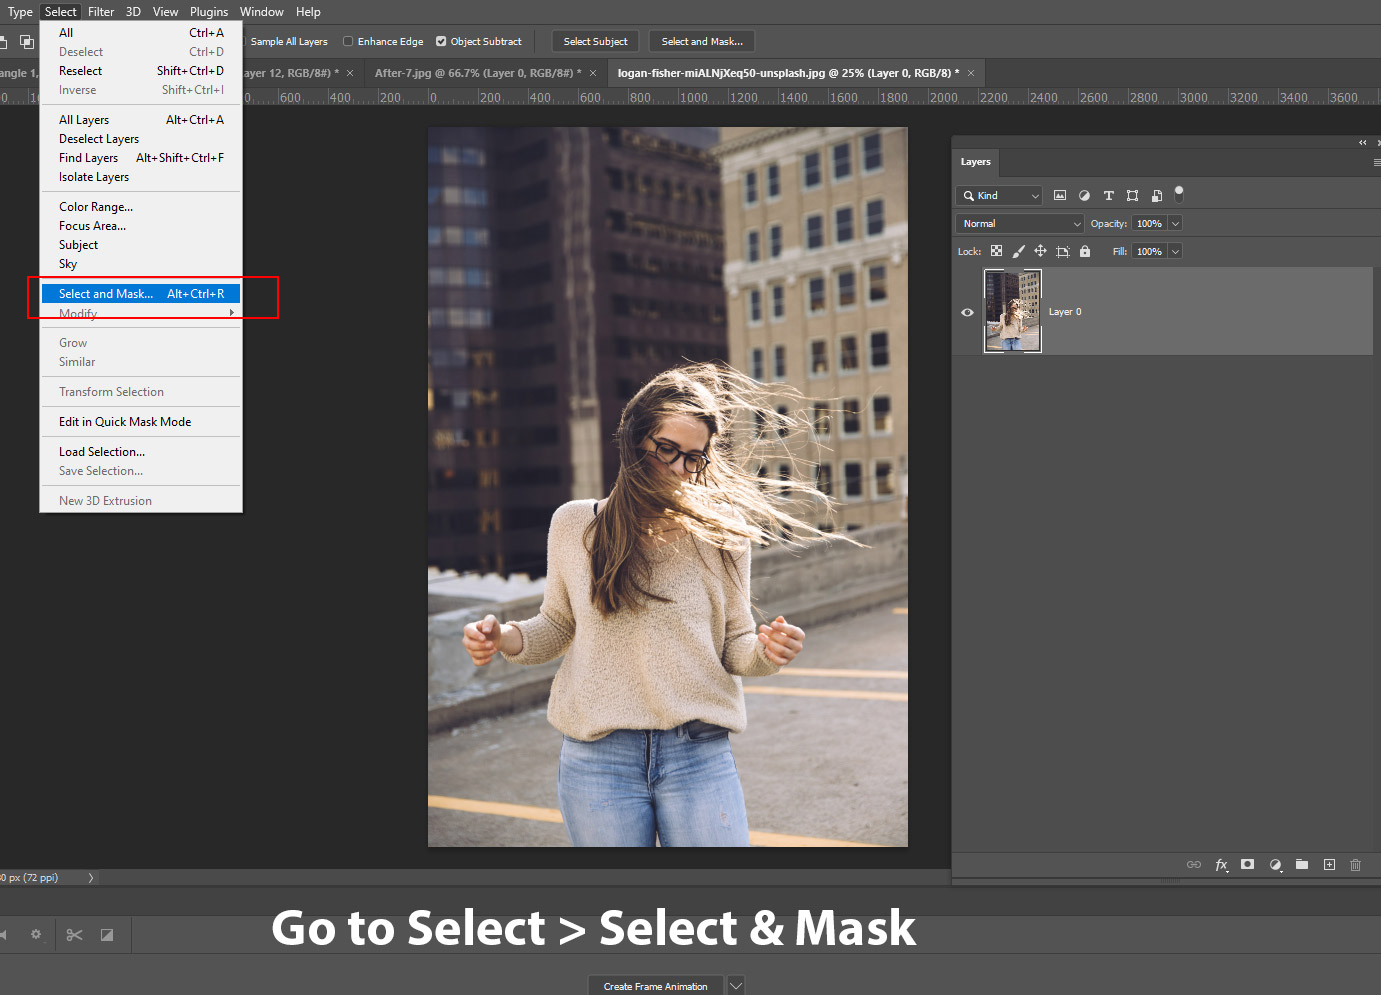
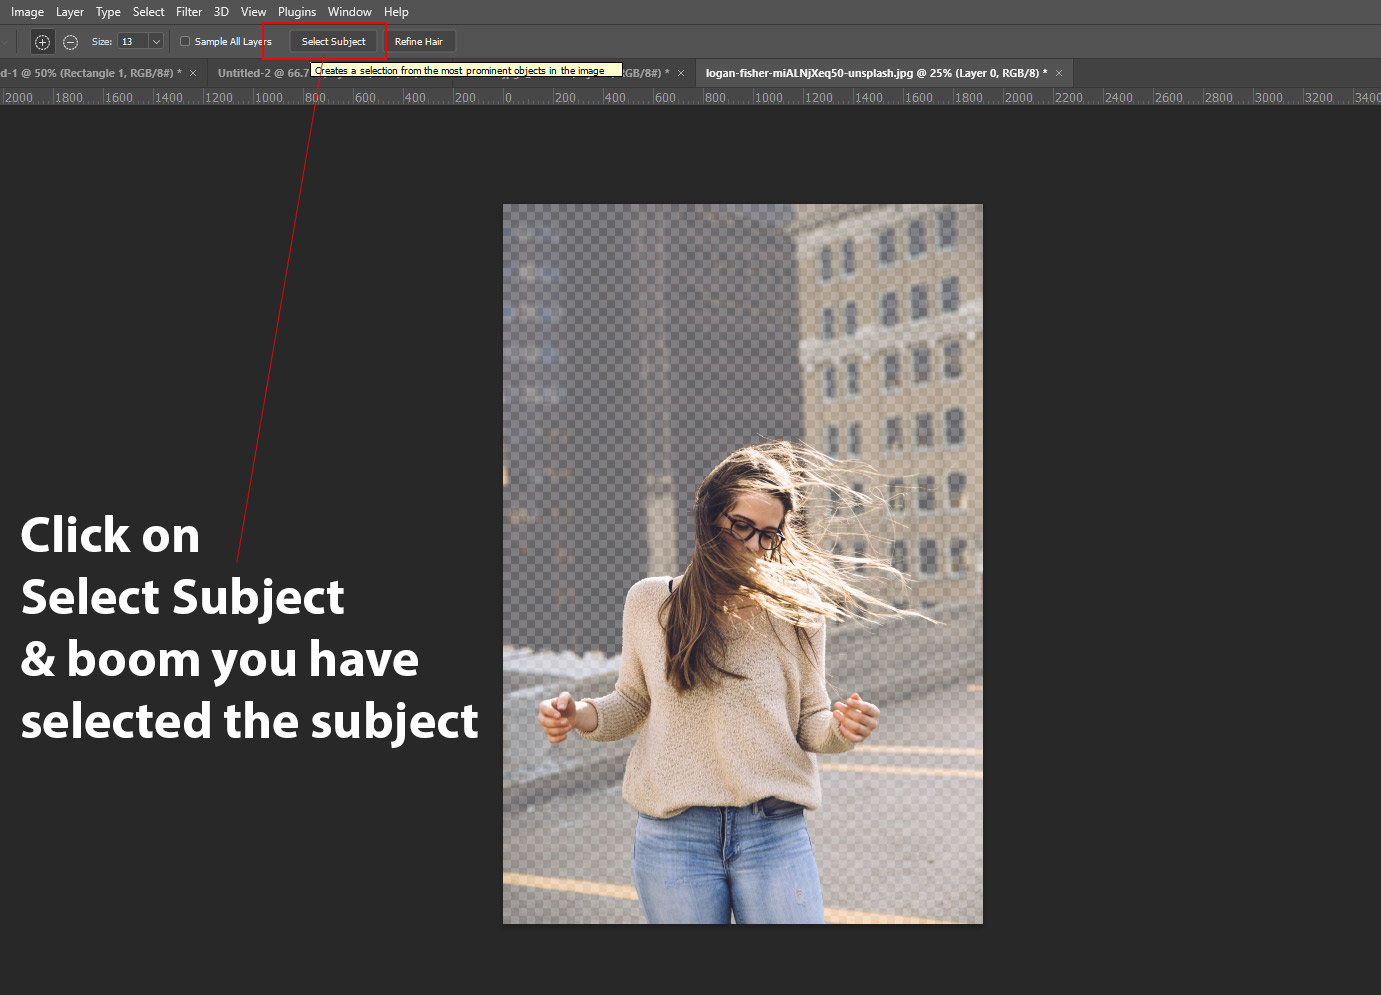
I am testing it with a complex background and it is not easy to select those fly-away hairs. To select the subject, click on the Select Subject Button and we have selected the subject.
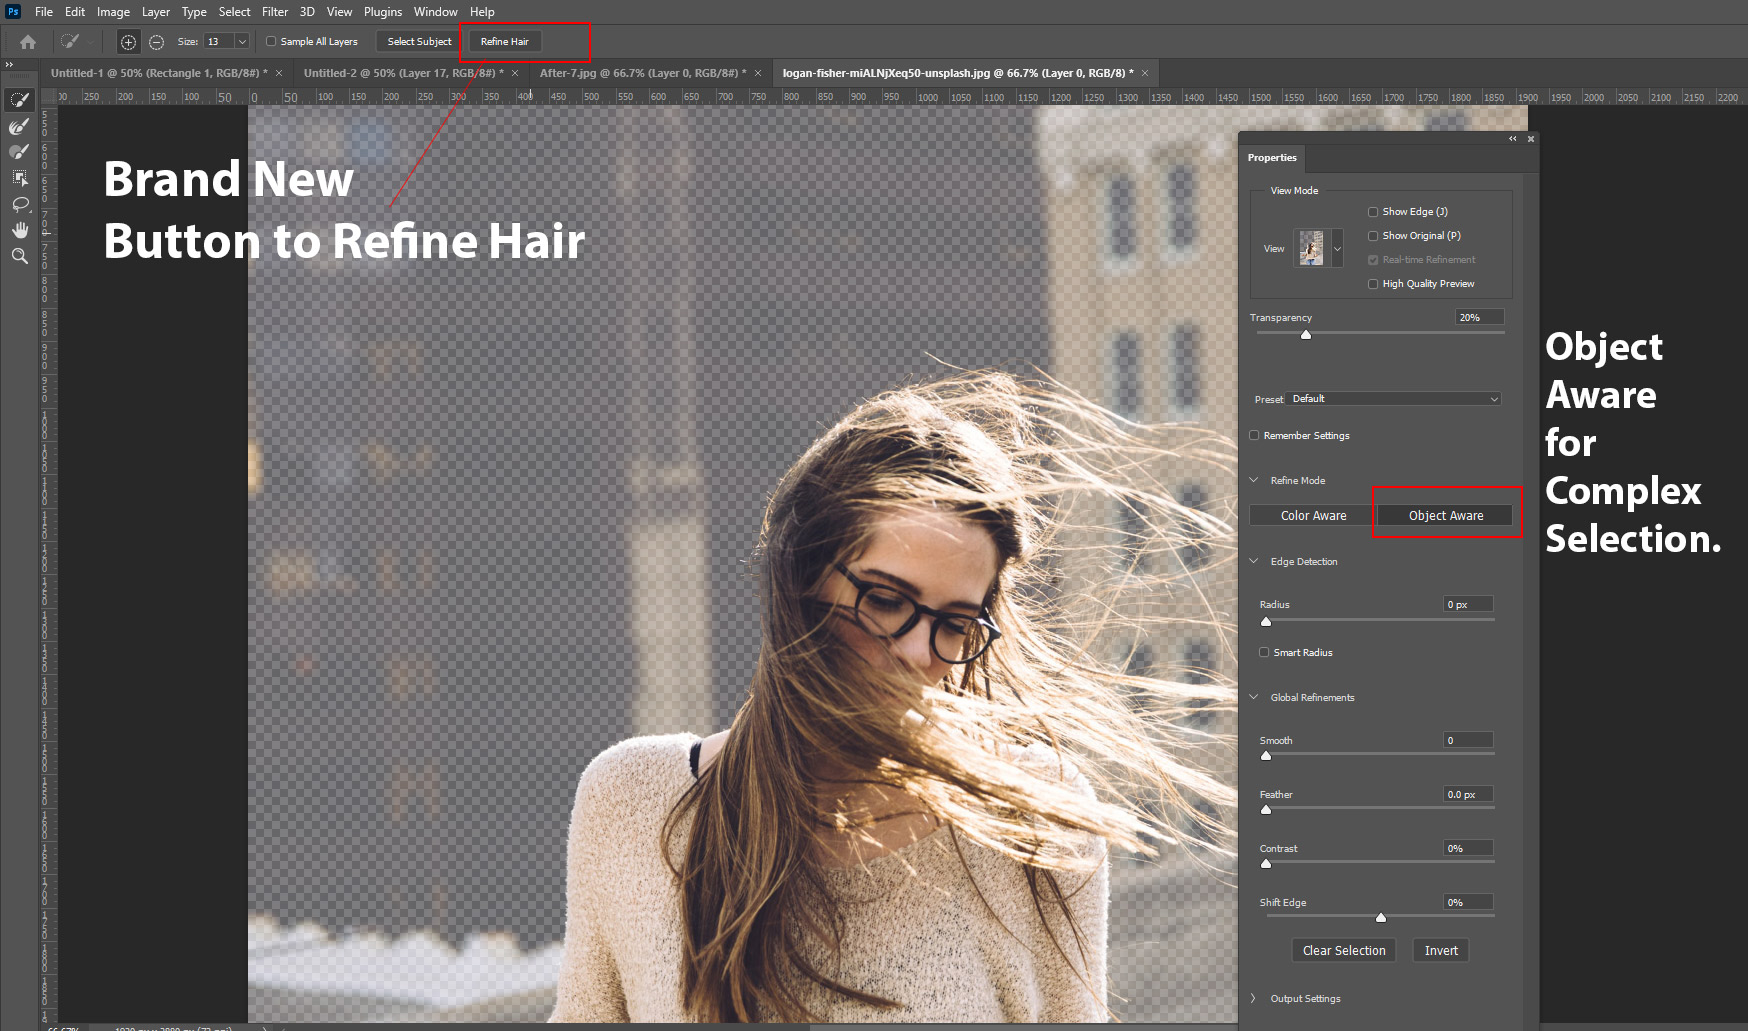
Now you can click on the brand new button Refine Hair to select the hair preciously. Also, in the properties of Select & Mask, you have two new options Refine Mode: Color-Aware & Object Aware. When you have a solid background you can use Color Aware Mode and if you are working with a busy and complex background such as we are, then use the Object Aware Mode.
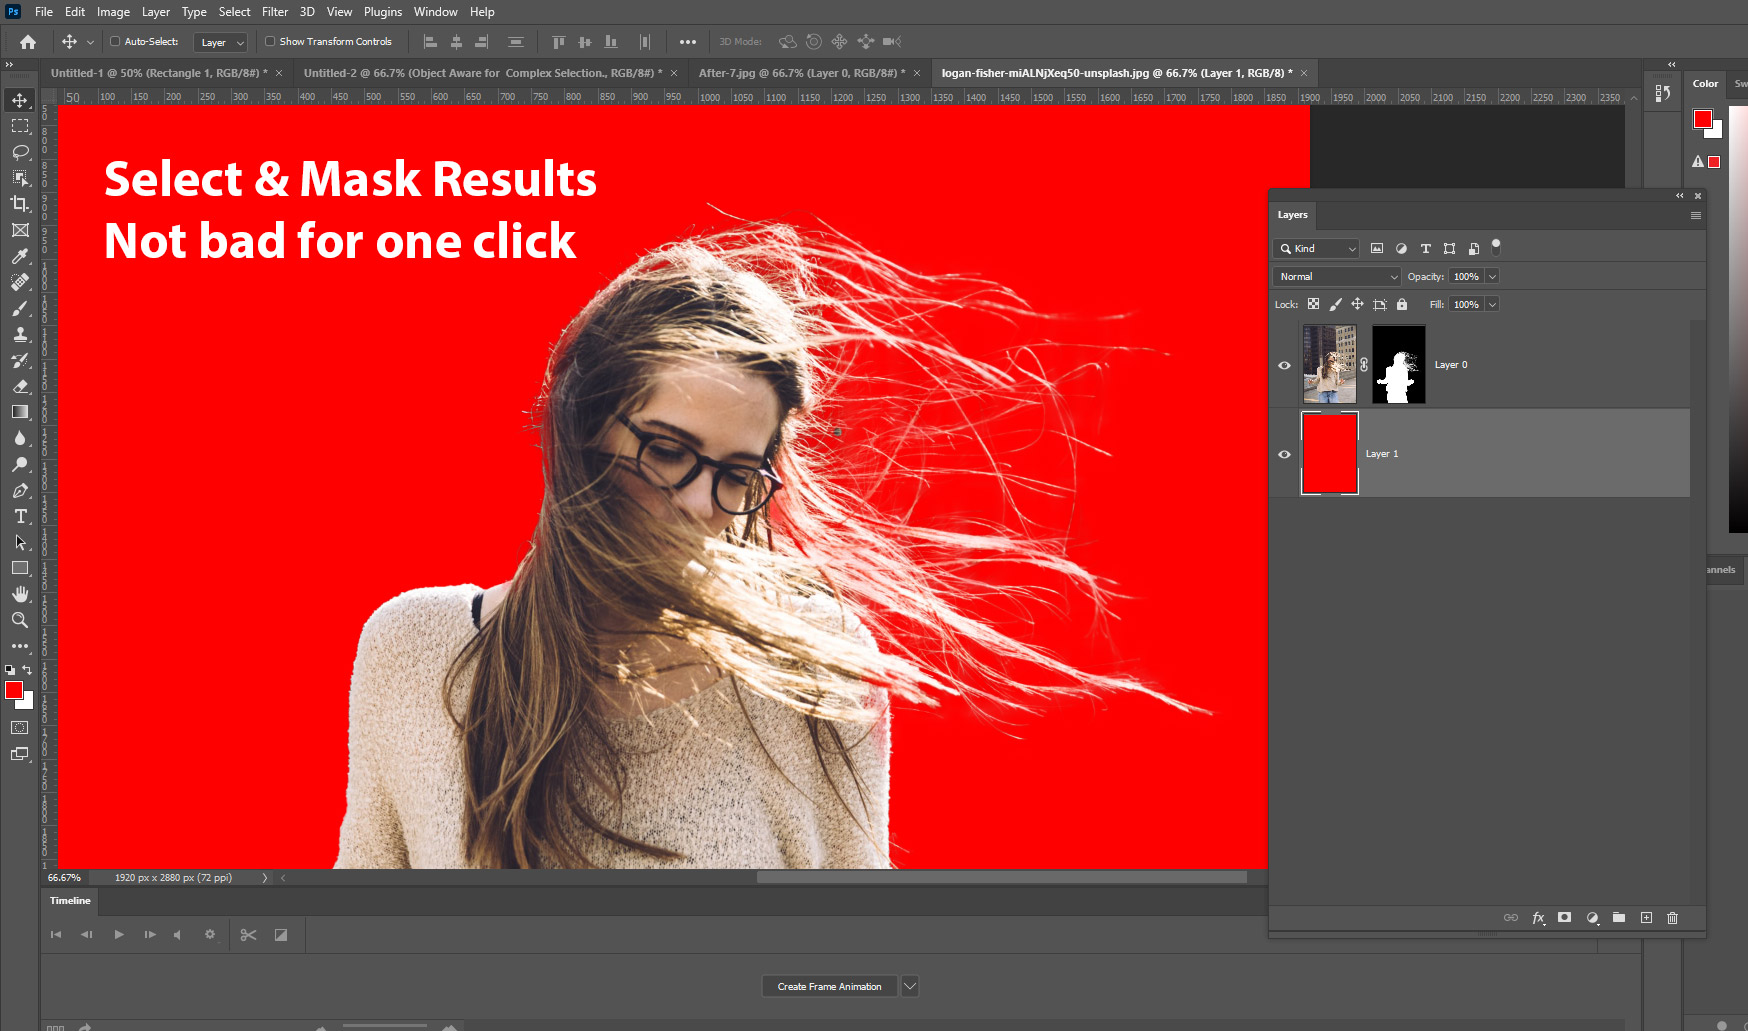
You can see the results on the red background and it’s not that bad for just one click!
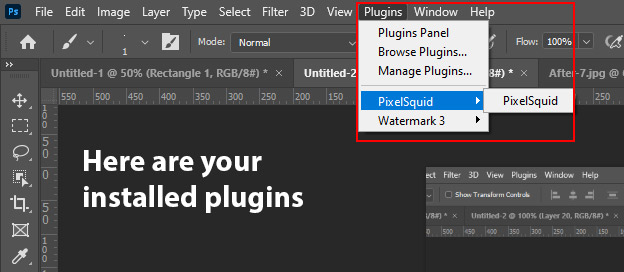
New Feature #9 – Plugins Menu
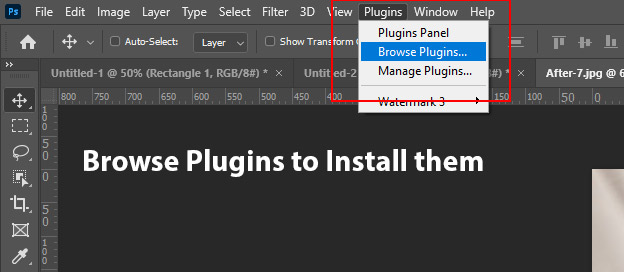
Next, we have Plugins Menus for plugins lovers. It has replaced the Extensions options from the Window Menu.

You can click on the Browse Plugins to browse the plugins and install them.
In the plugins library, click on the Get Button to install plugins.

You can see your installed plugins inside the Plugins Menu.
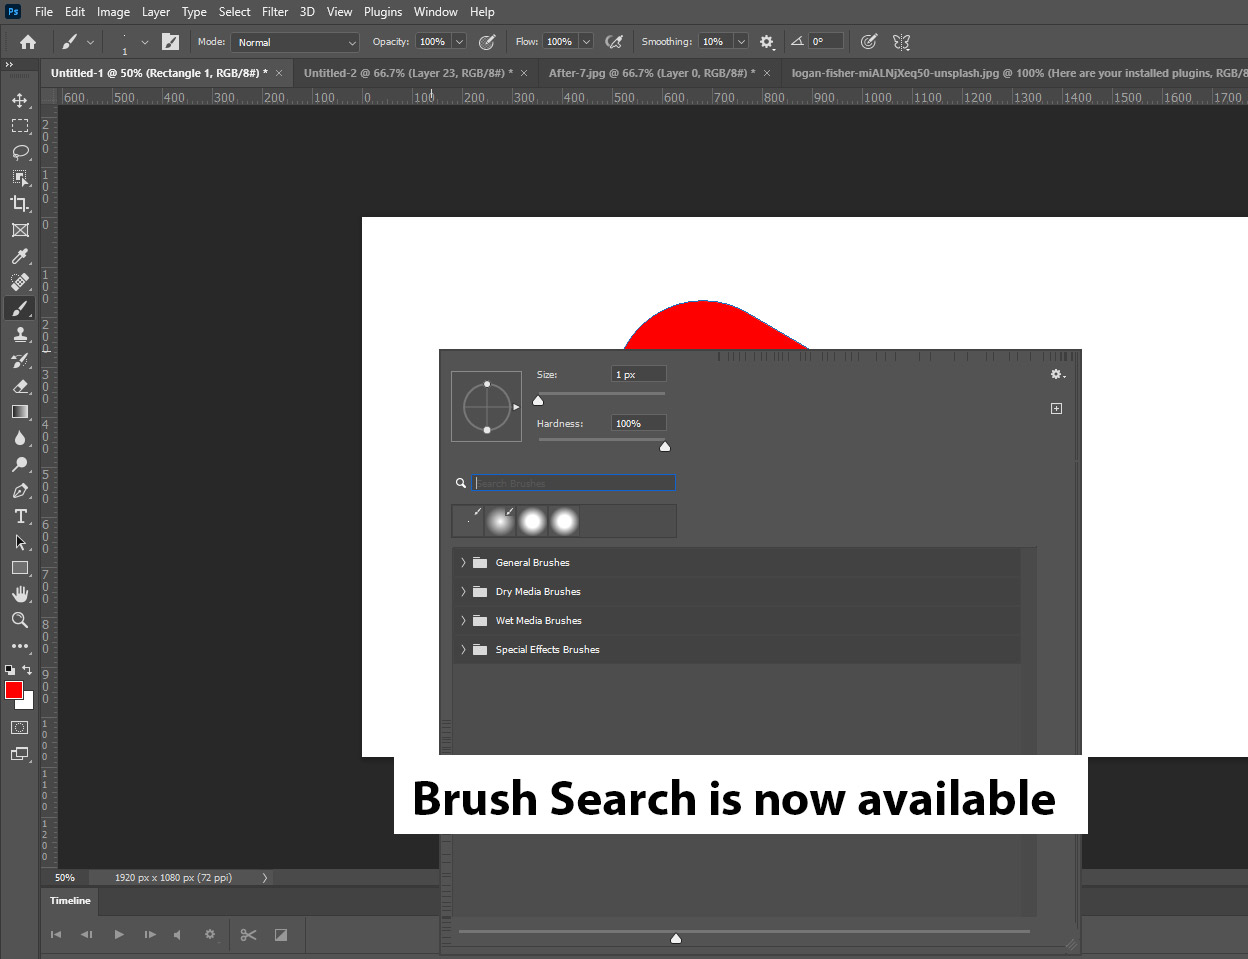
New Feature #10 – Brush Search
If you don’t care too much about organizing your brushes (like me), then you can find your brushes by searching them.
New Feature #11 – History Versions of Cloud Documents
If you save your work on the Cloud, you might be happy to see that now you can now find a history of your work in the cloud. To save your document on the cloud, you must save your document as cloud, to do this, go to File > Save As and then save the document as cloud documents.
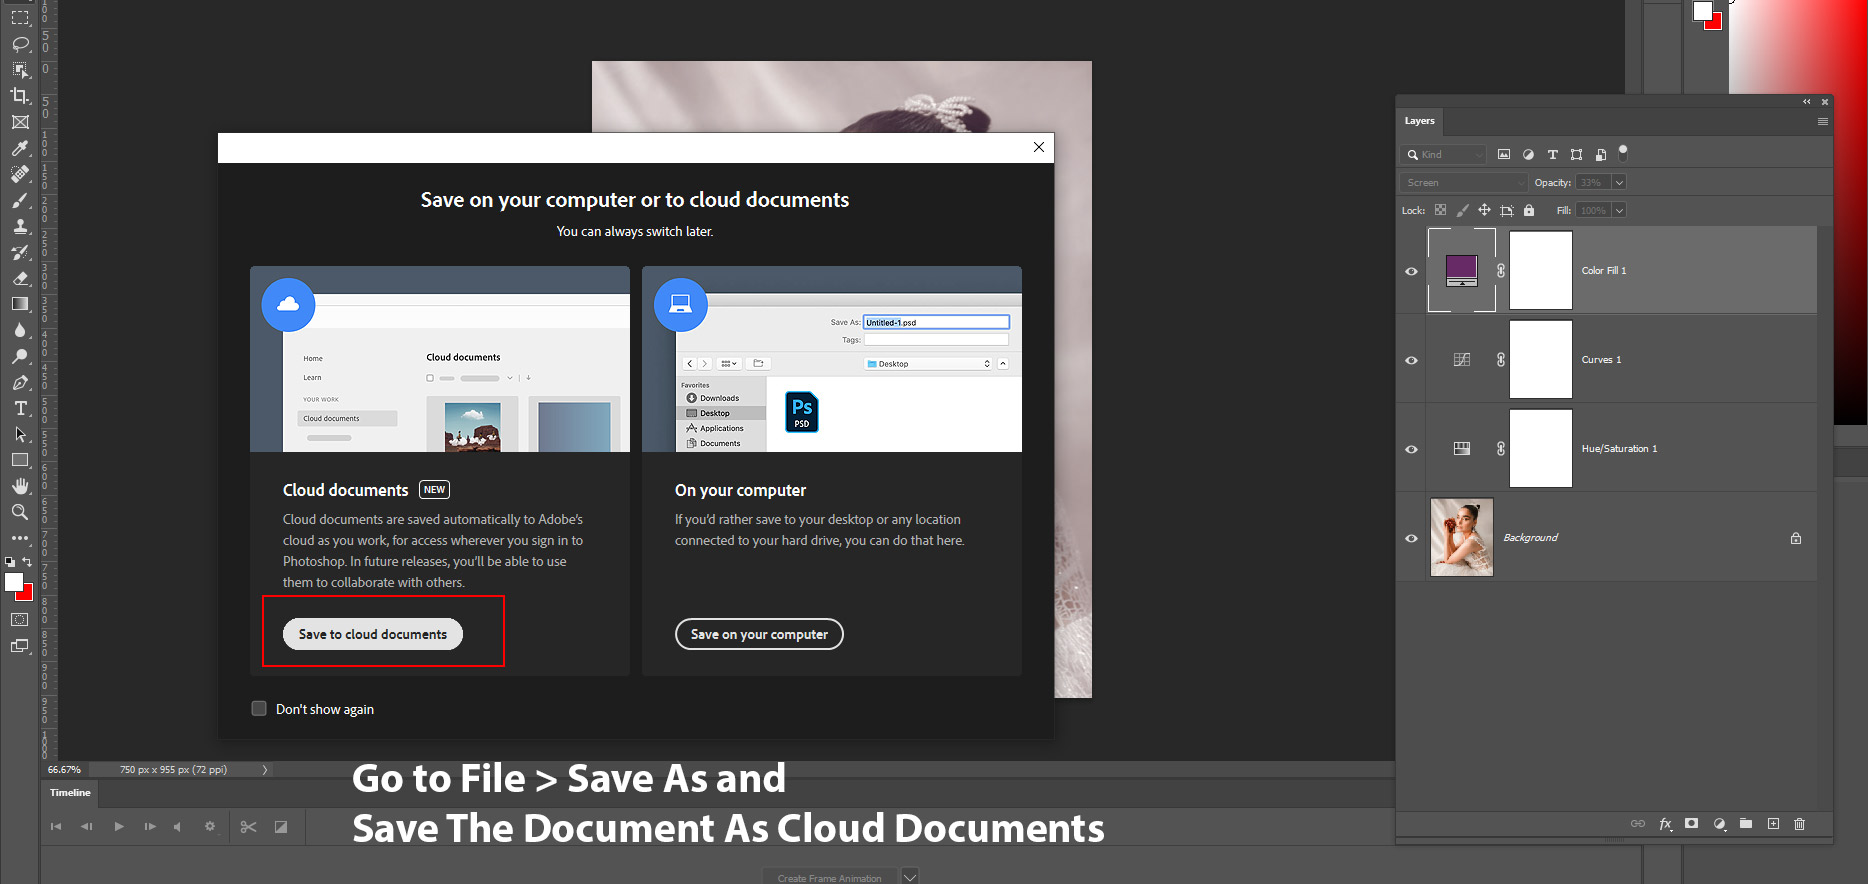
For some reason, my cloud documents weren’t saving as there was a problem with the sign-in process. For this example I had to get the screenshots from the Adobe site. Once you have saved your documents on the cloud, you can start working on them by selecting from Cloud Documents.

To see the Version History Tab, you can go to File > Version History.
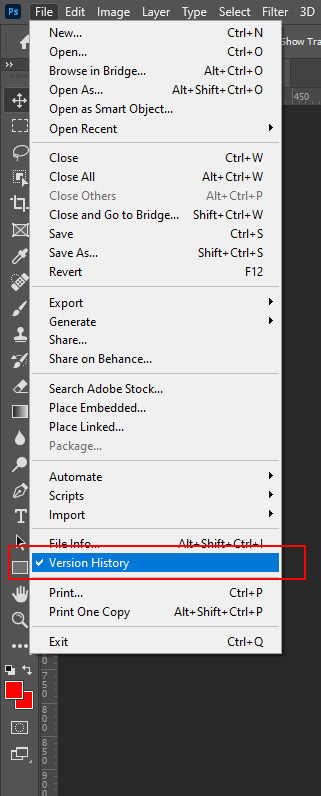
Then you can browse the saved versions of your work and you can even download them and start working on them on a new document.

New Feature #12 – Quick Actions
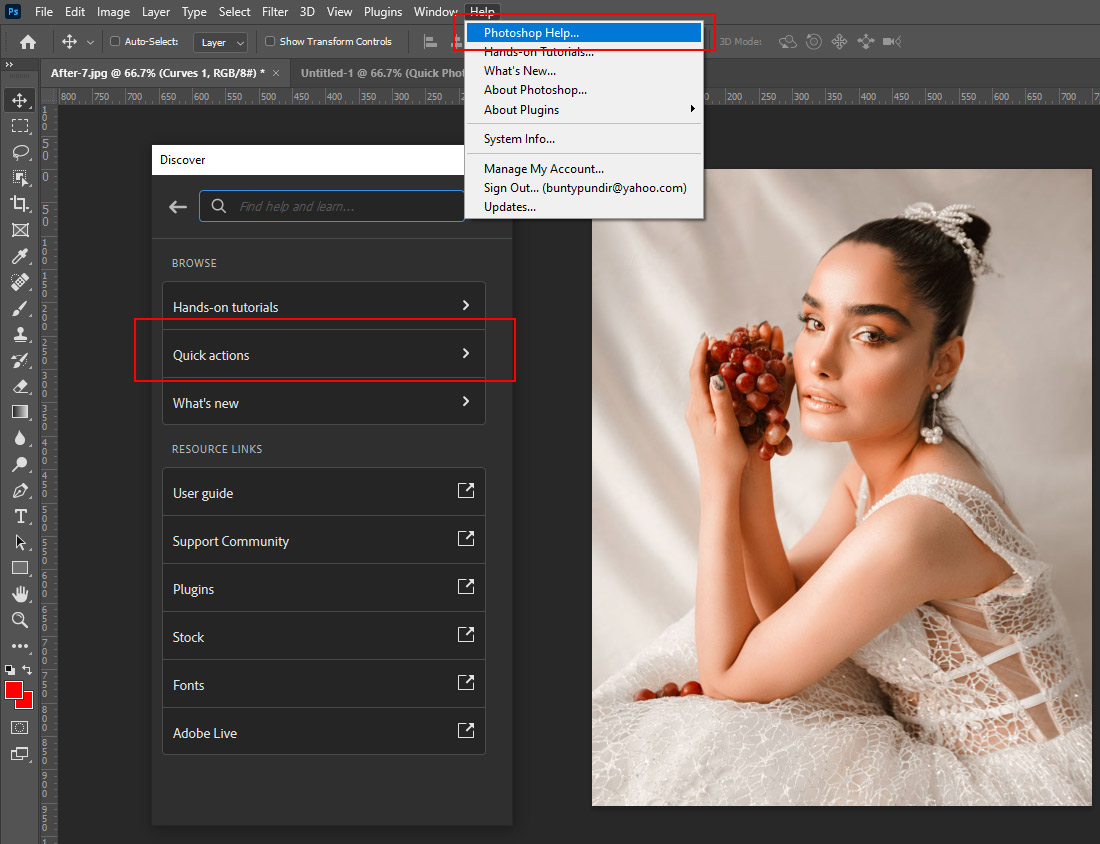
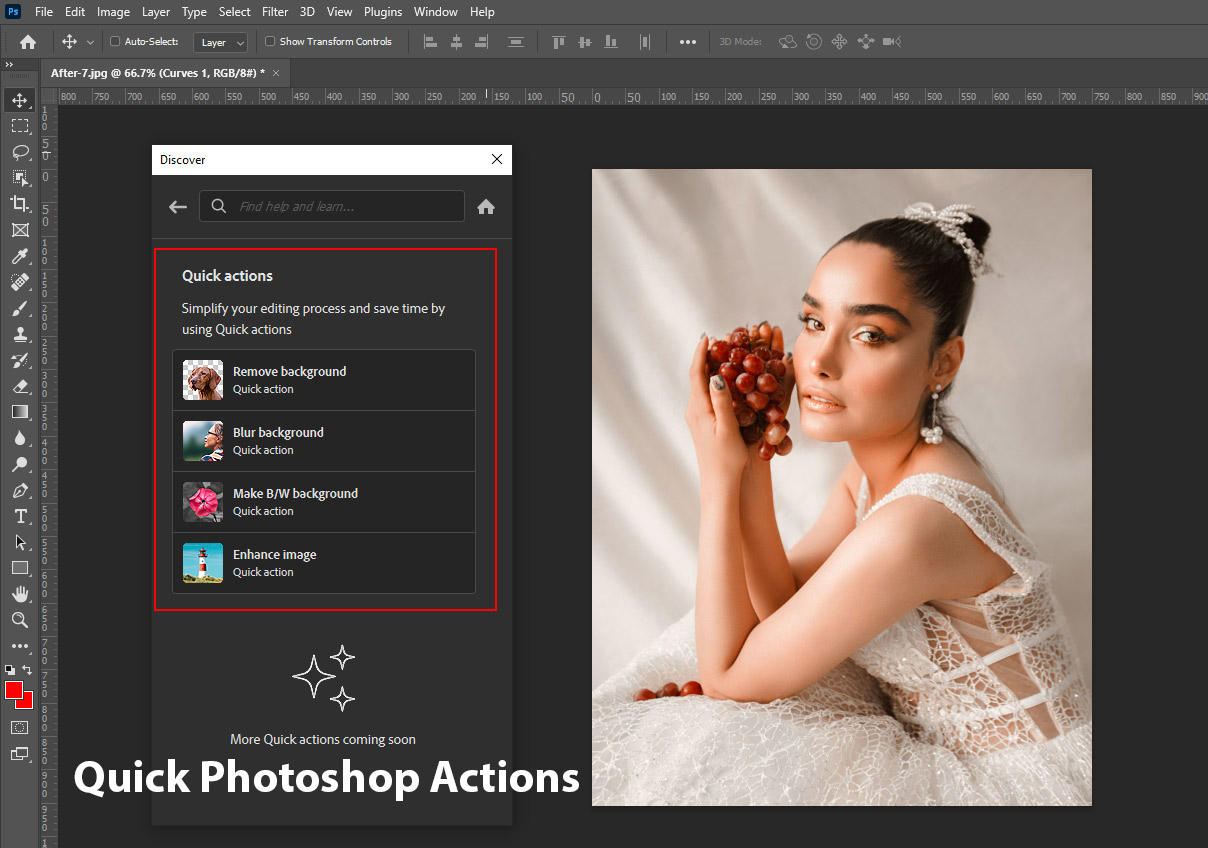
Photoshop has added some quick actions that will help you do some sort of editing like removing the background, blurring the background, and applying coloring in just one click. To access these quick actions, go to Help > Photoshop Help.
Photoshop’s Discover Tab will open and you can click on the Quick Actions to get quick actions. You can also search for helpful tutorials in the Discover tab, and it’s improved as well with helpful instructions and tutorials.
Click on the quick actions to use them.
What Are Your Thoughts on Photoshop 2021?
These are the features that stand out to me and I am glad they added them. I think Adobe has made huge improvements with A.I. editing, but keeping all options for manual editing makes Photoshop the go-to photo editing software.
What’s your favorite feature of Photoshop 2021? Comment down below!
The sky replacement tool works great
Yes, Larry. It works like a magic wand even preserve all the layers.